How to Make the 7-Step Easy Thanksgiving Turkey Recipe
Table of Contents
I. Introduction: Why This is Your New Go-To Easy Thanksgiving Turkey Recipe
The Thanksgiving turkey often feels like the final boss of holiday cooking. It’s the centerpiece, the star, and unfortunately, the source of most kitchen stress. Will it be dry? Will it be done on time? We understand that intimidation factor. That’s why we’ve stripped away the complexity and unnecessary steps to bring you the definitive easy Thanksgiving turkey recipe.
This isn’t about fancy techniques or complicated brines; it’s about a simple, 7-step master plan guaranteed to deliver a flawlessly golden, beautifully juicy turkey every single time. Even if this is your first bird, this beginner turkey recipe will have you carving a masterpiece that anchors a truly memorable holiday meal. We’re turning that overwhelming cooking challenge into a simple, relaxing triumph.
II. Essential Prep: The Foundation for a Juicy Turkey
The key to preventing dry meat and ensuring a flavorful turkey lies in the preparation before it even touches the oven. Don’t skip these foundational steps!
Selecting Your Bird
A good rule of thumb is to plan for about 1.5 pounds of turkey per person, which accounts for bone weight and ensures enough leftovers. If your turkey is frozen, allow ample time for thawing—about 24 hours for every 5 pounds—in the refrigerator. Never thaw at room temperature, as this is unsafe and compromises the meat’s texture.
Required Ingredients and Tools
The beauty of this simple method is the minimal ingredients required.
| Ingredient | Role |
|---|---|
| Whole Turkey | Thawed and ready |
| Unsalted Butter | Softened, the primary source of moisture and flavor. |
| Fresh Herbs | Sage, Thyme, Rosemary (essential for the classic flavor). |
| Aromatics | One onion, a head of garlic, and one lemon (for the cavity). |
| Salt and Pepper | Kosher salt is best for exterior seasoning. |
The most critical tool you’ll need is a digital, probe meat thermometer. Forget pop-up timers! This is the only way to guarantee a safe, perfectly cooked, and juicy turkey.
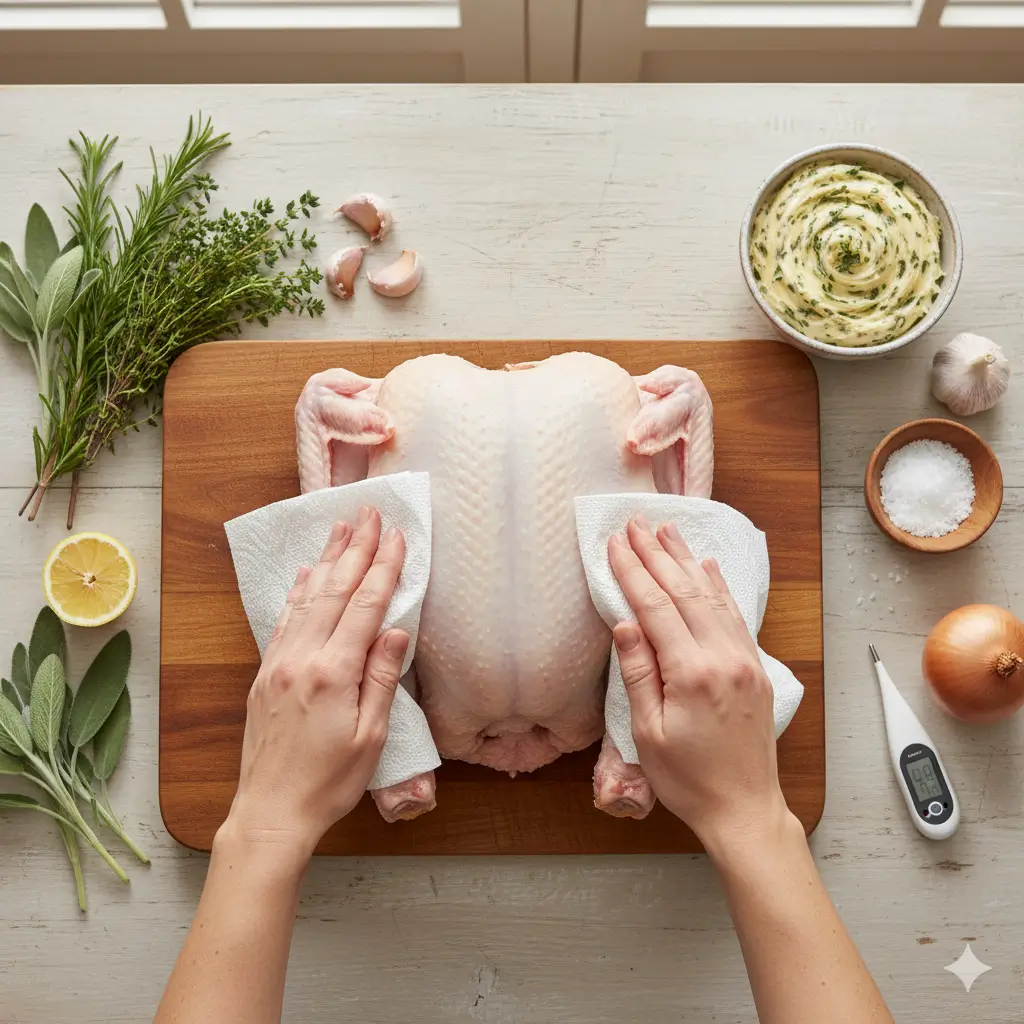
The Critical Step 0: Thawing and Patting Dry
Once thawed, remove the turkey from the fridge and let it sit at room temperature for about an hour before cooking. More importantly, you must pat the turkey absolutely dry—inside and out—using paper towels. Any moisture on the skin will turn to steam in the oven, preventing the skin from crisping and browning beautifully. A dry bird equals golden, crunchy skin, which elevates the whole holiday meal.
III. The 7-Step Master Plan: Cooking Your Thanksgiving Turkey
This is the core of our easy Thanksgiving turkey recipe. Follow these steps precisely, and you will achieve a bird that looks like it came straight from a magazine cover.
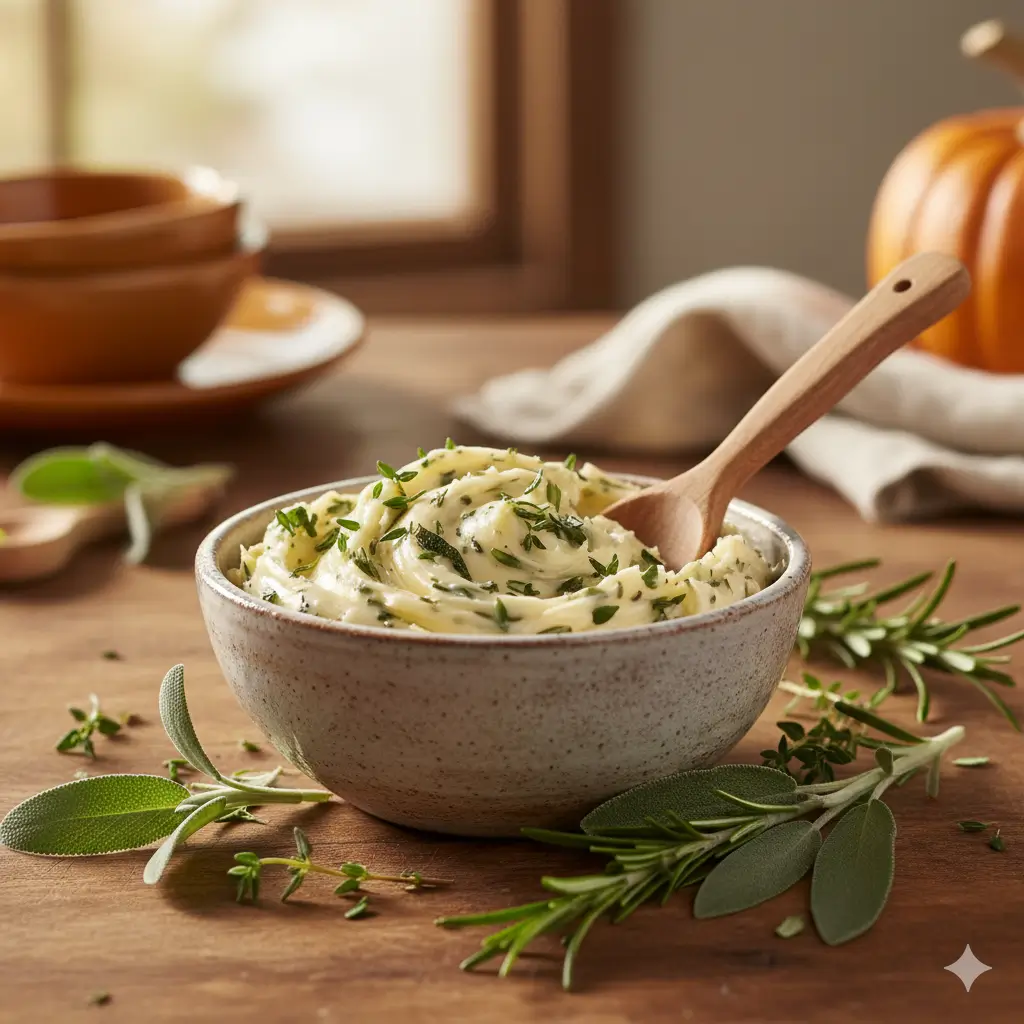
Step 1: Compound Butter Creation
| Ingredient | Quantity | Details |
|---|---|---|
| Unsalted Butter (softened) | 1 stick | Base for your compound butter. Ensure it’s at room temperature for easy mixing. |
| Fresh Sage (minced) | 1 tablespoon | Adds an earthy, aromatic flavor to the butter blend. |
| Fresh Thyme (minced) | 1 tablespoon | Provides subtle herbal notes that complement poultry perfectly. |
| Fresh Rosemary (minced) | 1 tablespoon | Delivers a rich, piney aroma to enhance flavor depth. |
| Salt | 1 teaspoon | Balances and enhances the natural butter flavor. |
| Black Pepper | 1/2 teaspoon | Adds a gentle heat and helps bring out the herbs’ aroma. |
| Tip: Mix all ingredients thoroughly in a small bowl until the herbs are evenly distributed. This “compound butter” will keep your turkey juicy and flavorful. | ||
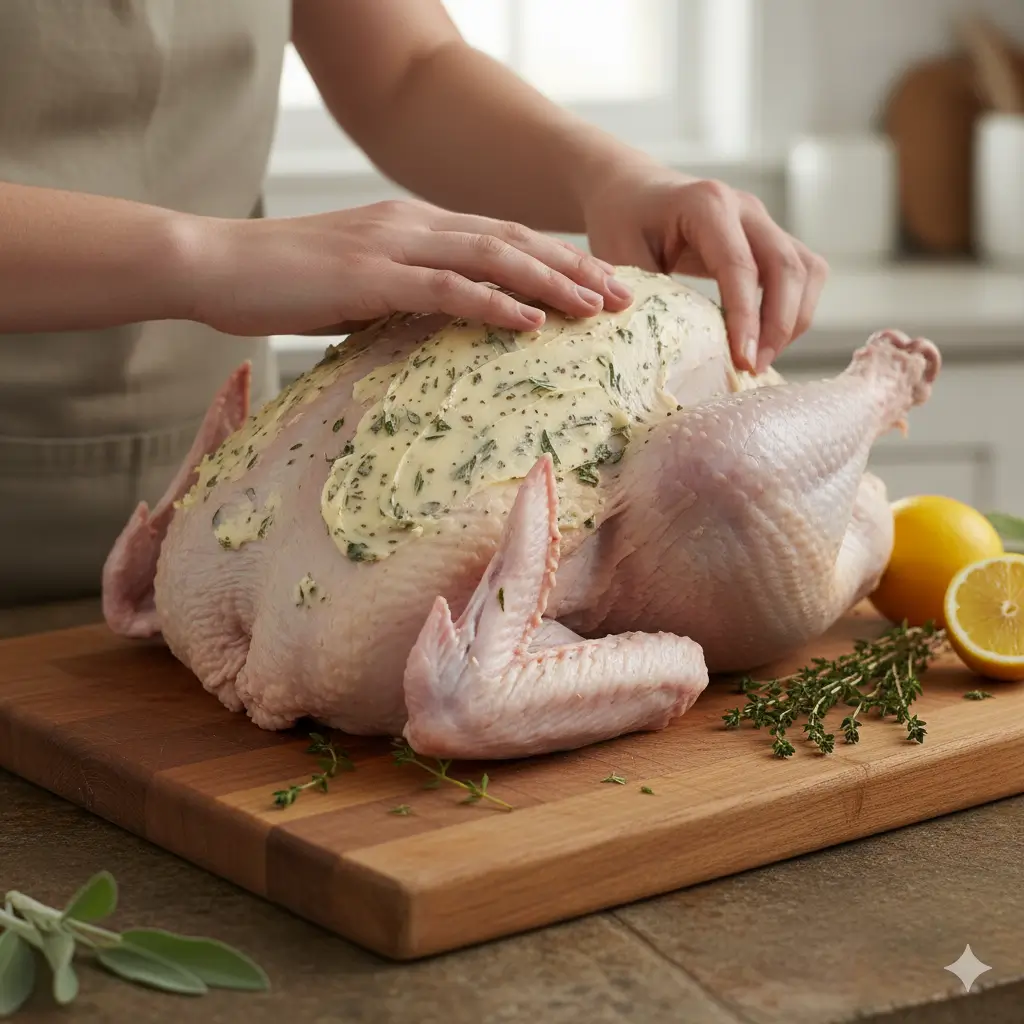
Step 2: Seasoning Strategy (Under and Over the Skin)
This step ensures the meat itself is seasoned, not just the skin. Gently use your fingers to loosen the skin over the breast and thighs. Take about three-quarters of your compound butter and gently massage it directly onto the meat under the skin. Push it down over the breast muscle and thighs. Rub the remaining quarter of the butter over the exterior of the skin, focusing on an even coating.
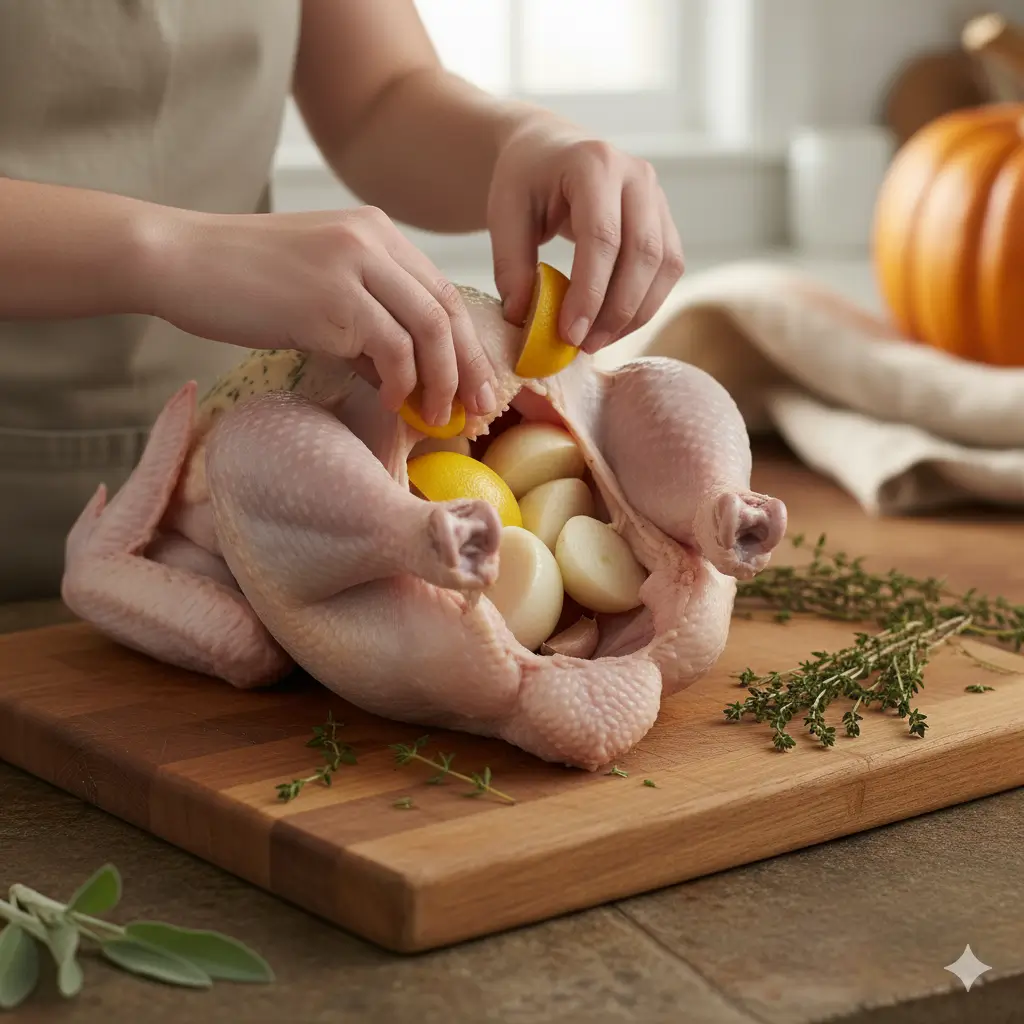
Step 3: Stuffing the Cavity (Aromatics Only)
For the best results with this easy Thanksgiving turkey recipe, we strongly advise against cooking traditional bread stuffing inside the bird. Internal stuffing insulates the cavity, significantly slowing down cooking time and risking raw spots. Instead, place half a sliced onion, half a head of garlic, and a quartered lemon inside the cavity. These aromatics will steam from the inside, infusing the meat with flavor without impeding the cooking process.
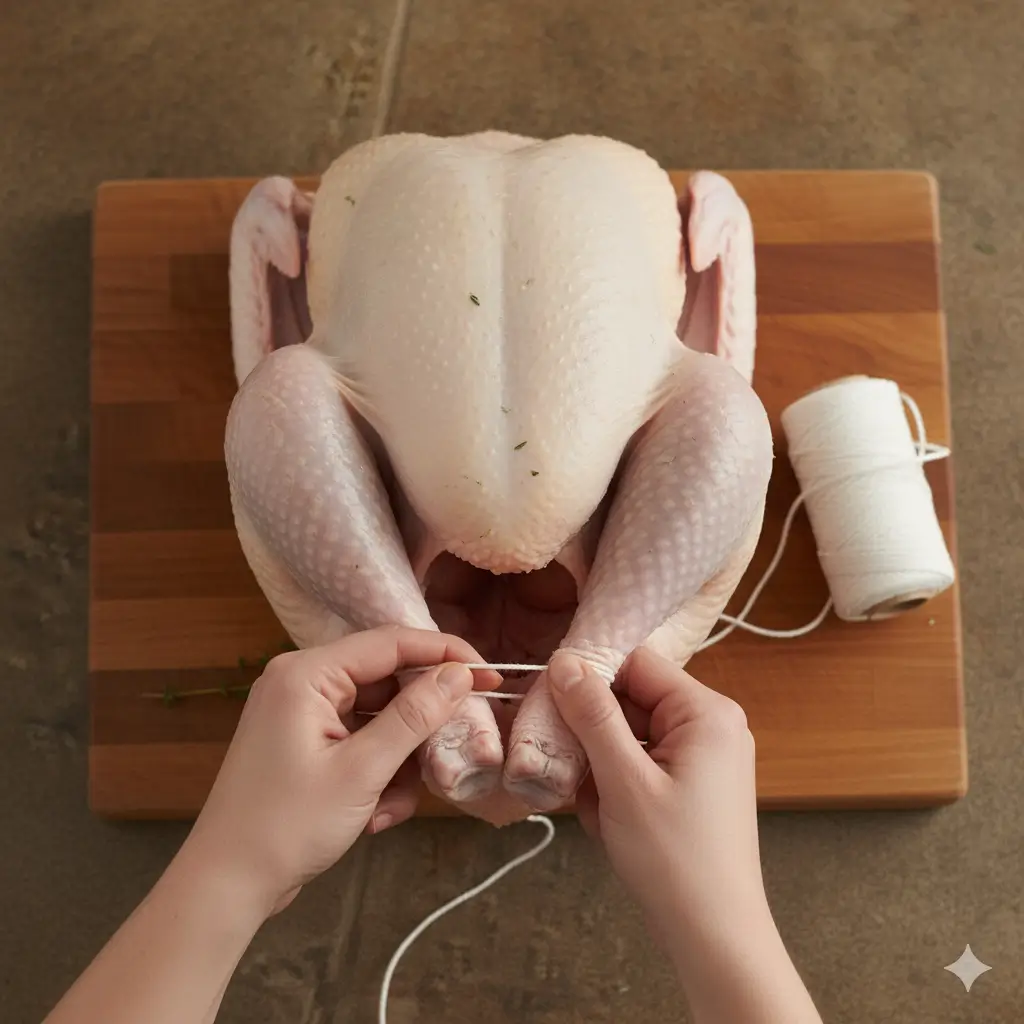
Step 4: Trussing and Tucking
Trussing—the act of tying the legs together—helps the turkey hold a compact shape, leading to more even cooking. It also ensures the exposed leg joints don’t dry out. Use kitchen twine to tie the legs together and tuck the wing tips underneath the body.
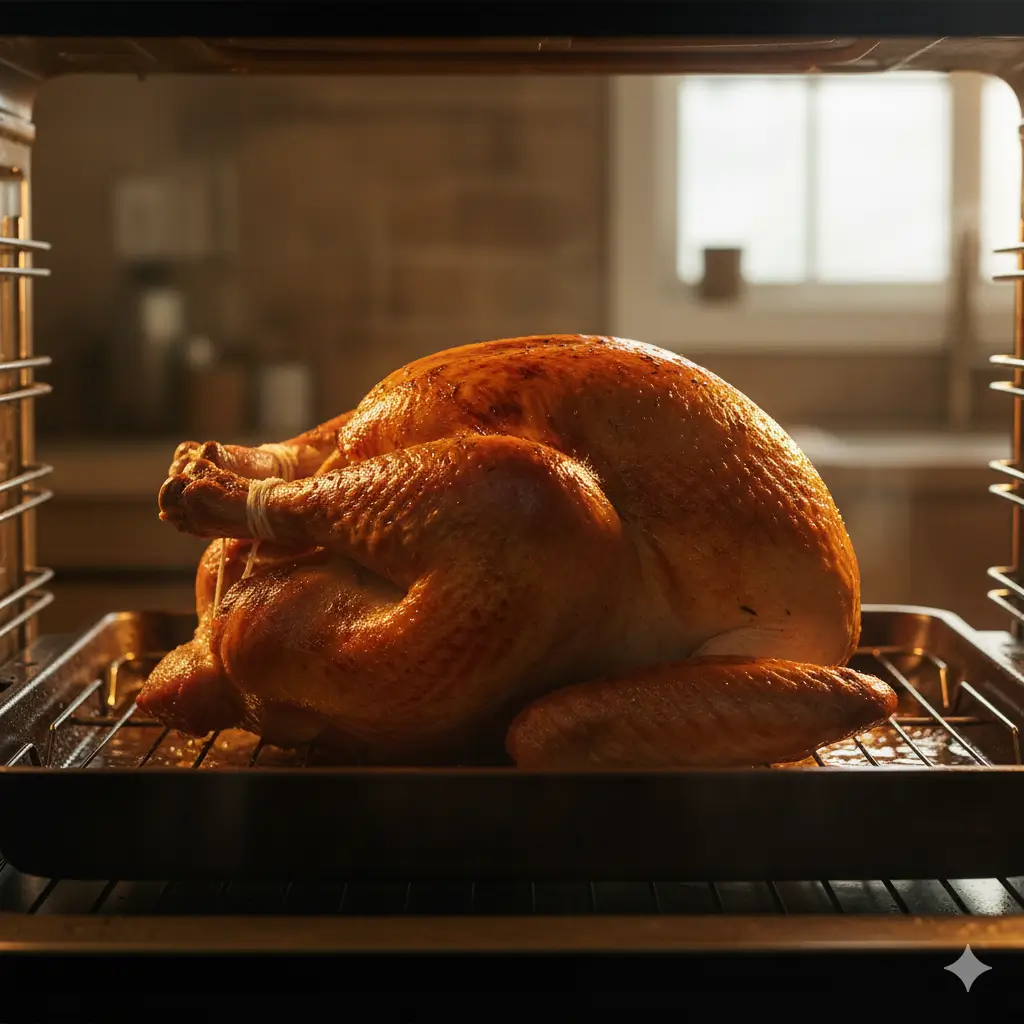
Step 5: The High-Heat Start
| Step | Action | Details |
|---|---|---|
| Preparation | Place the turkey on a rack in a shallow roasting pan. | Ensures even air circulation and prevents the bottom from getting soggy. |
| Oven Temperature | 425°F (220°C) | Start the turkey in a preheated oven at this high temperature for the best browning. |
| Cooking Time | 30–45 minutes | Roast at this temperature to create a golden, crispy skin and seal in the juices. |
| Purpose | High-Heat Start | This initial blast of heat locks in moisture and gives the turkey a rich, appetizing color. |
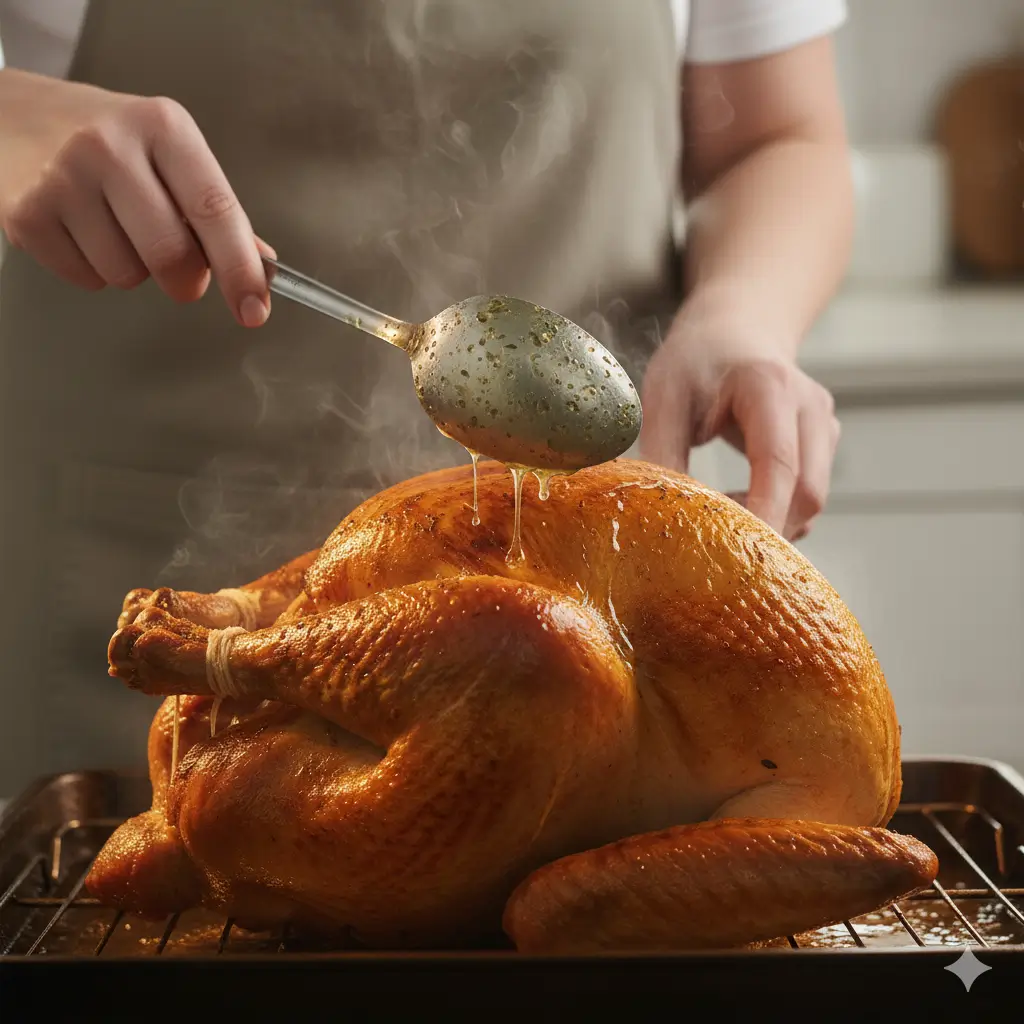
Step 6: Lowering the Temperature and Basting
| Step | Action | Details |
|---|---|---|
| 1 | Reduce Oven Temperature | After the initial high heat, lower the oven to 325°F (160°C) for slow, even cooking. |
| 2 | Baste Regularly | Baste the turkey every 45 minutes using pan drippings or melted butter to keep it moist and flavorful. |
| 3 | Minimize Heat Loss | Open the oven door quickly during basting to prevent temperature drops that can affect cooking time. |
| 4 | Maintain Steady Heat | This consistent, gentle heat ensures a tender and juicy Thanksgiving turkey. |
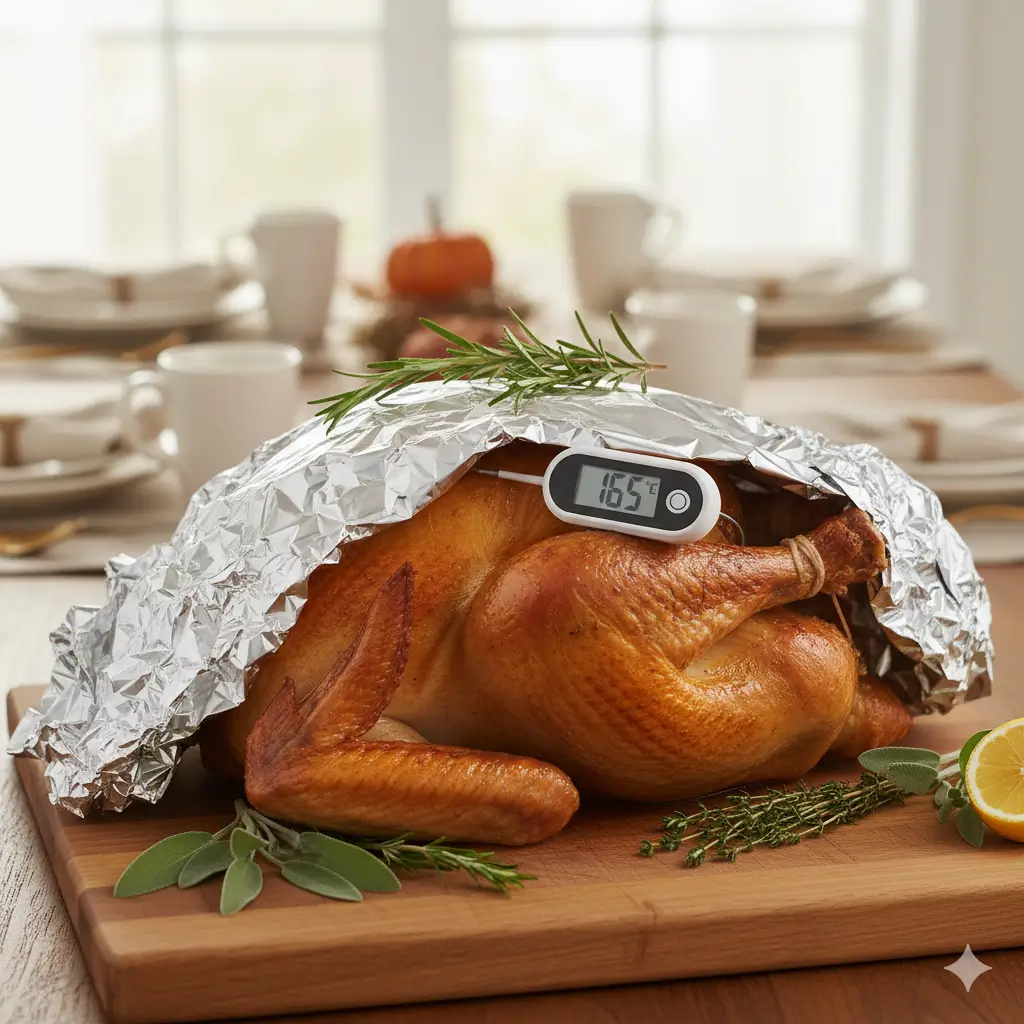
Step 7: The Thermometer and Rest
| Aspect | Temperature / Time | Important Notes |
|---|---|---|
| Turkey Breast | 165°F (74°C) | Insert the thermometer into the thickest part of the breast without touching the bone for an accurate reading. |
| Turkey Thigh | 175°F (80°C) | Check the thickest part of the thigh—this ensures the dark meat is fully cooked and tender. |
| Resting Time | At least 30 minutes | After reaching the correct temperatures, remove the turkey, tent loosely with foil, and let it rest. This allows juices to redistribute for a moist, flavorful result. |
| Tip: Never skip the rest period—it’s essential for keeping the turkey juicy and evenly textured throughout every slice. | ||
IV. Troubleshooting and Expert Tips for the Beginner Turkey Recipe
Even with the best plan, unexpected issues can arise. Here are some solutions to common problems that will help you master this beginner turkey recipe. If you’re wondering how to make biscuits perfectly alongside your bird, remember that the “don’t overwork the dough” rule applies here to the turkey: don’t overcook it!
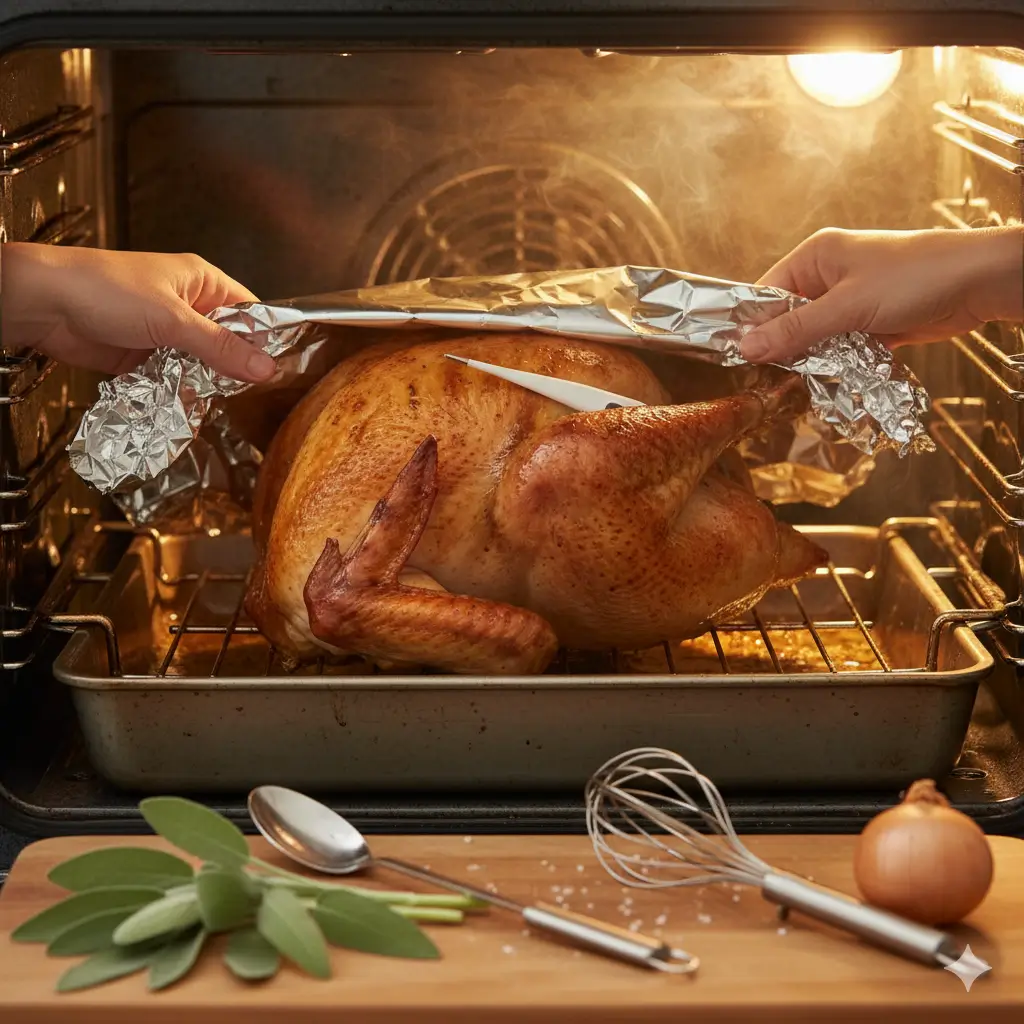
Solving the Dry Breast Problem
The turkey breast is leaner than the dark meat and cooks faster, making it susceptible to drying out. The simplest fix is shielding it. If the breast skin browns too quickly (usually halfway through cooking), gently drape a piece of aluminum foil over the entire breast. This insulates the area and slows cooking down, allowing the thighs to catch up.
Dealing with Underdone Thighs
If the breast hits 165°F but the thighs haven’t reached 175°F, you have two options: remove the turkey from the oven, carve off the breast meat and tent it separately, then return the thighs to the oven to finish; or, if you have a removable probe thermometer, simply cover the breast completely and allow the thighs to continue cooking until the correct temperature is reached.
Using Pan Drippings
Don’t let those flavorful pan drippings go to waste! After removing the turkey, pour the drippings into a fat separator. Use the remaining liquid (without the fat) to form the base of an incredible, simple gravy, completing your holiday meal.
E-E-A-T Tip: Never pierce the skin!
Resist the urge to pierce the skin with a fork to check for doneness or flavor. Every poke is a puncture that allows precious juices (moisture and fat) to escape into the pan, resulting in a drier turkey. Rely solely on the meat thermometer!
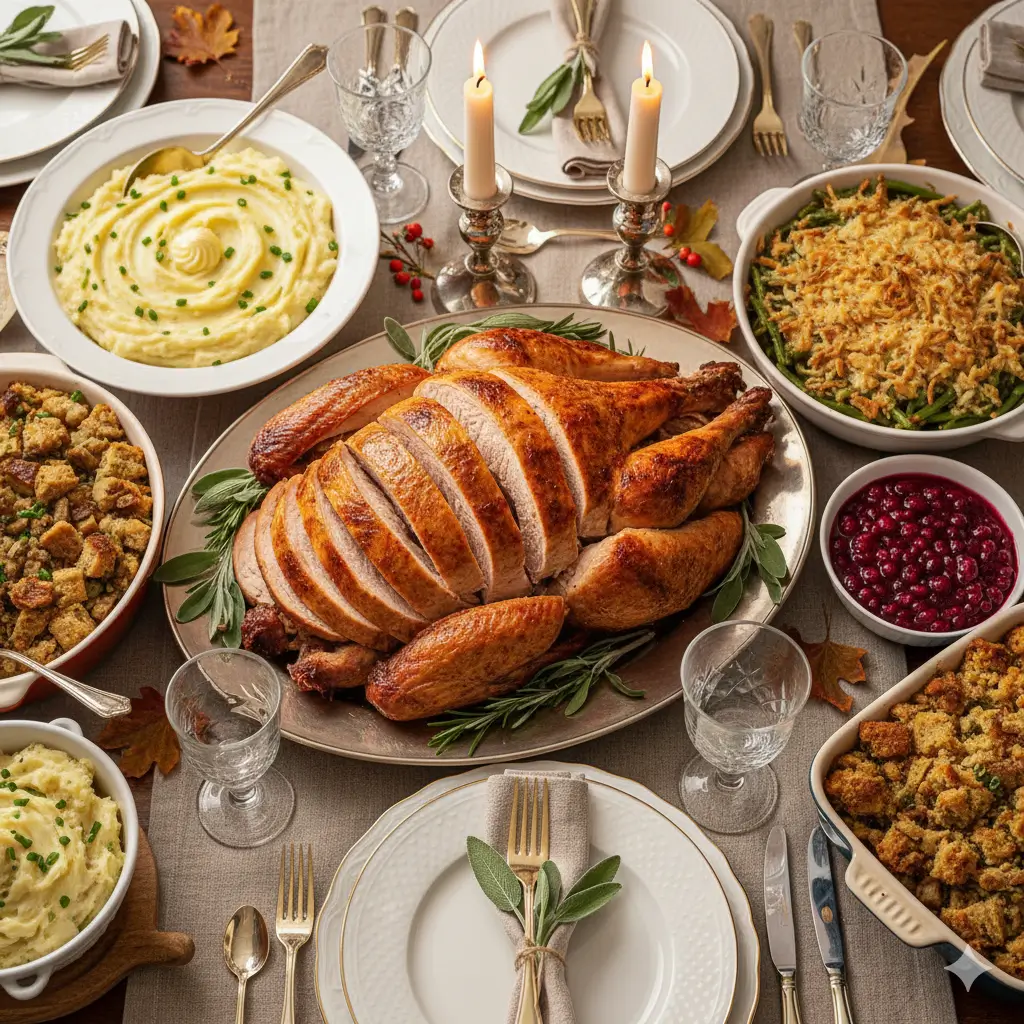
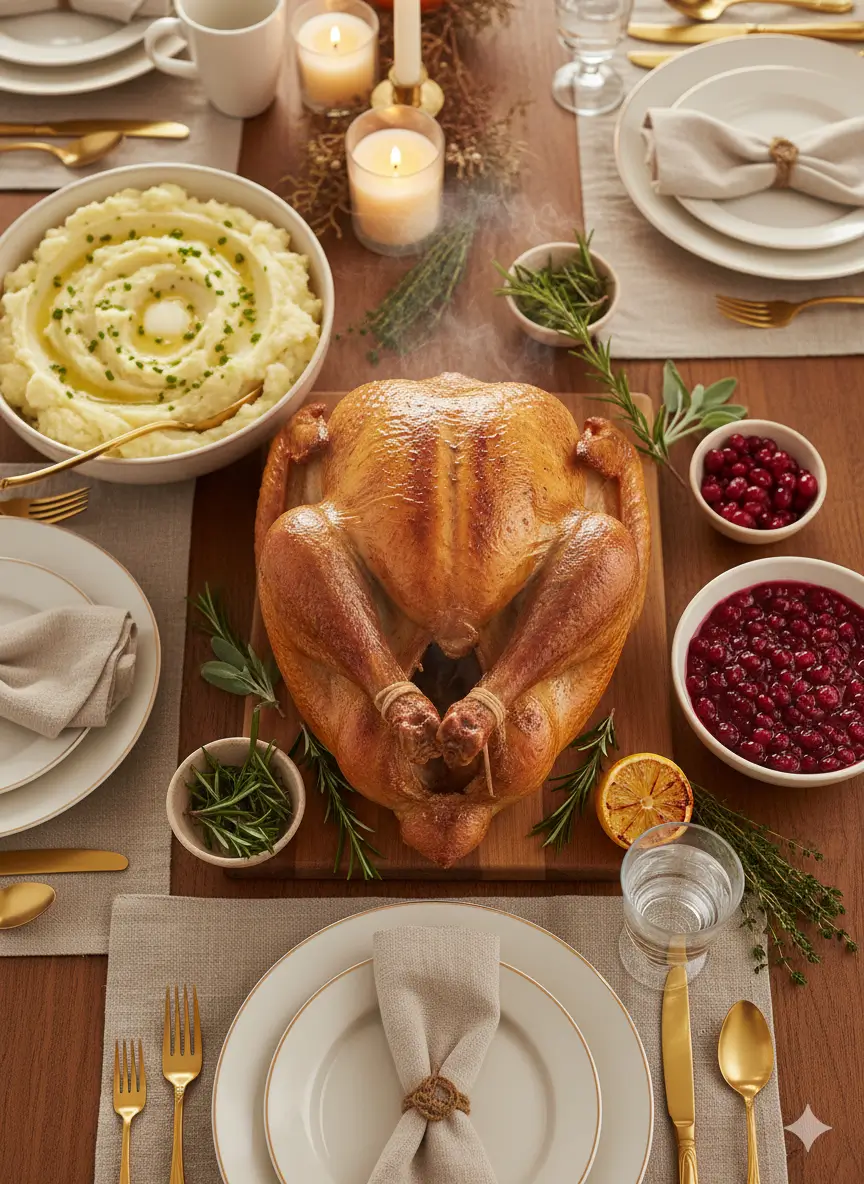
V. Serving Suggestions and Making it a Complete Holiday Meal
A perfect turkey deserves equally impressive, yet simple, accompaniments.
Side Dish Pairings
Keep the sides simple to complement the flavor of the turkey, not overpower it. Classic pairings include mashed potatoes, a creamy green bean casserole, and a simple cranberry sauce. Because we recommended against stuffing the bird, having a simple bread stuffing baked in a casserole dish ensures everyone gets a taste.
Carving Advice
Presentation is everything! Use a sharp carving knife. First, remove the legs and wings at the joints. Then, slice the breast meat horizontally, following the bone. Remember to carve after the mandatory 30-minute rest to keep every slice perfectly juicy.
Leftovers Strategy
After cooling, slice all remaining meat off the bone immediately. Store the white and dark meat in separate airtight containers. This prevents the meat from drying out while sitting on the carcass and ensures you get the maximum value and ease from your easy Thanksgiving turkey recipe.

VI. Final Thoughts: Your Easiest, Juiciest Holiday Meal Ever
You now have the simple, proven roadmap to a stress-free and spectacular Thanksgiving turkey. By following this 7-step process, focusing on temperature control, and prioritizing the all-important rest, you can confidently deliver a beautifully golden bird that is tender, moist, and unforgettable. This easy Thanksgiving turkey recipe proves that the holiday meal can be simple and delicious. Go ahead—enjoy the feast and the well-deserved compliments!
VII. Essential FAQs for Your Easy Thanksgiving Turkey Recipe
These FAQs address common user fears and solidify the content’s status as a comprehensive resource.
Should I Wash the Turkey Before Cooking ?
Absolutely not. Rinsing raw turkey in the sink does not remove bacteria; instead, it sprays bacteria droplets around your kitchen, creating a cross-contamination hazard. The heat of the oven is what kills bacteria. Simply pat the turkey dry with paper towels, as instructed, and discard the paper towels immediately.
How Do I Keep the Turkey Breast from Drying Out ?
There are two key methods built into this easy Thanksgiving turkey recipe:
- Compound Butter : Placing seasoned butter under the skin keeps the meat moist from the inside out.
- Foil Shielding : If the breast browns too quickly, cover it loosely with a foil tent for the remainder of the cooking time to protect it from the direct heat.
Can I Prep the Turkey the Night Before ?
Yes, absolutely, and this is highly recommended for a smooth Thanksgiving day! You can complete Steps 1 through 4 (creating the compound butter, seasoning, stuffing with aromatics, and trussing) the night before. Keep the fully prepped turkey covered in the roasting pan in the refrigerator. Just be sure to take it out 1-2 hours before roasting to let it come up to room temperature.
What If I Don’t Have a Meat Thermometer ?
While not recommended for the beginner turkey recipe (as a thermometer is the single best way to ensure safety and juiciness), if you must proceed without one, look for clear signs of doneness: when you pierce the thigh, the juices should run completely clear, not pink. However, investing $15 in a digital thermometer will save you the stress and guarantee your holiday meal is perfect.
Your Feedback Helps Us Grow!
There are no reviews yet. Be the first one to write one.