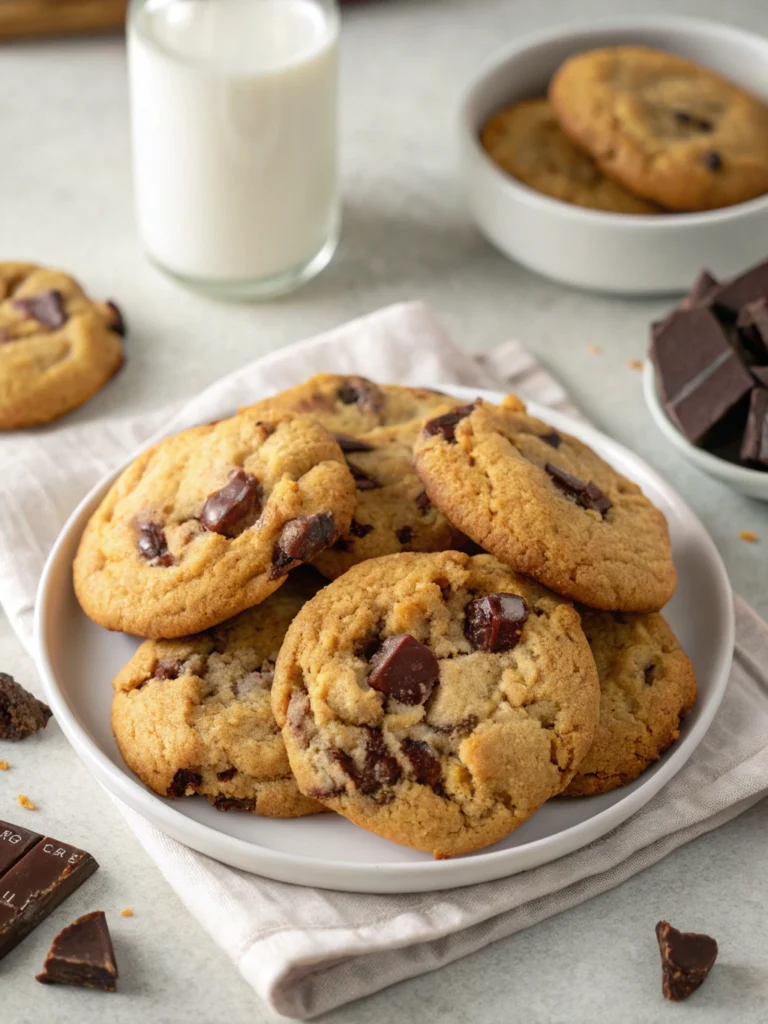
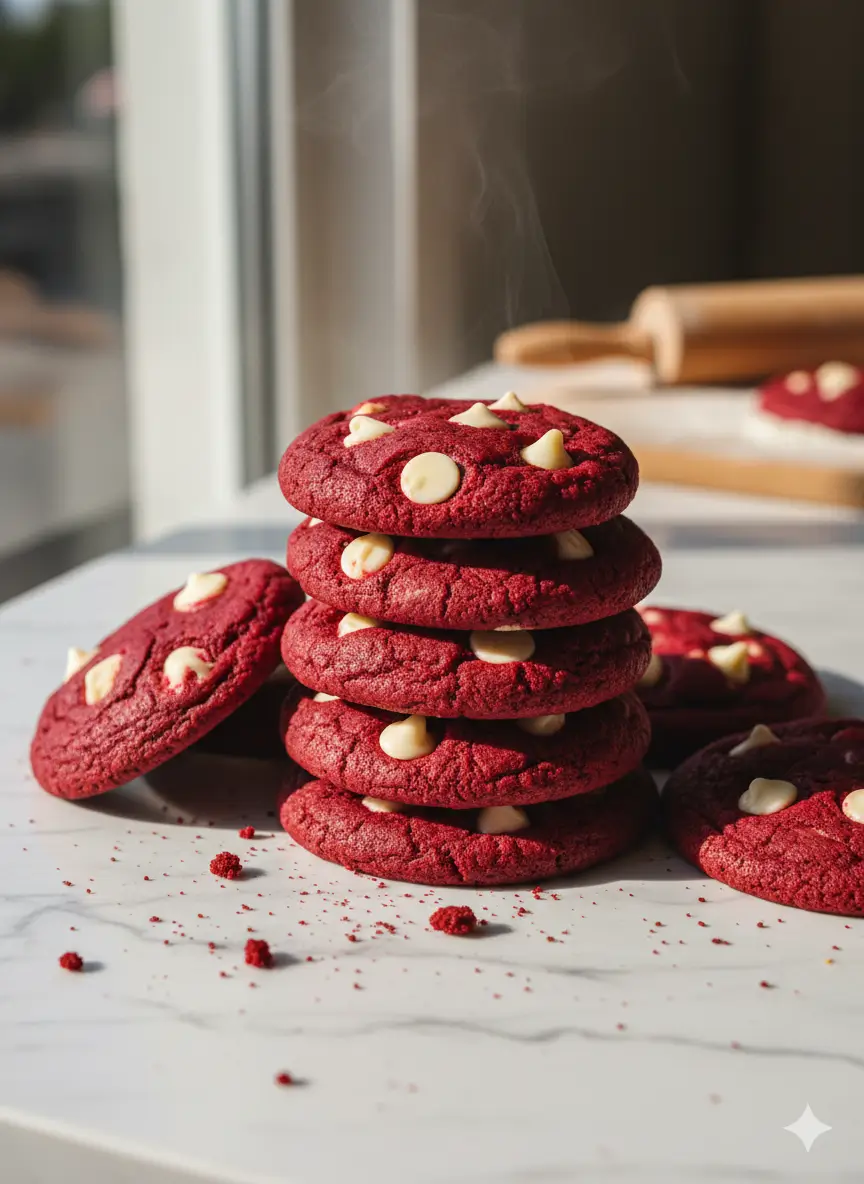
Easy Red Velvet Cookies: 7 Steps to Bakery Perfect Treats
Table of Contents
Introduction
Have you ever wondered why bakery red velvet cookies taste so much richer and softer than homemade versions? The secret isn’t just in the ingredients—it’s in the technique. Easy Red Velvet Cookies are one of the most sought-after treats during holidays and celebrations, yet many home bakers struggle to achieve that signature tender crumb and vibrant color. According to recent baking trends, red velvet desserts have seen a 35% increase in searches over the past year, proving their timeless appeal. In this guide, you’ll discover the 7 essential steps to creating bakery-quality Easy RedVelvet Cookies right in your own kitchen. Whether you’re a beginner or a seasoned baker, this red velvet cookies recipe will walk you through every detail—from mixing the perfect dough to achieving that iconic soft texture. Get ready to impress your family and friends with homemade red velvet cookies that rival any professional bakery.
Ingredients List
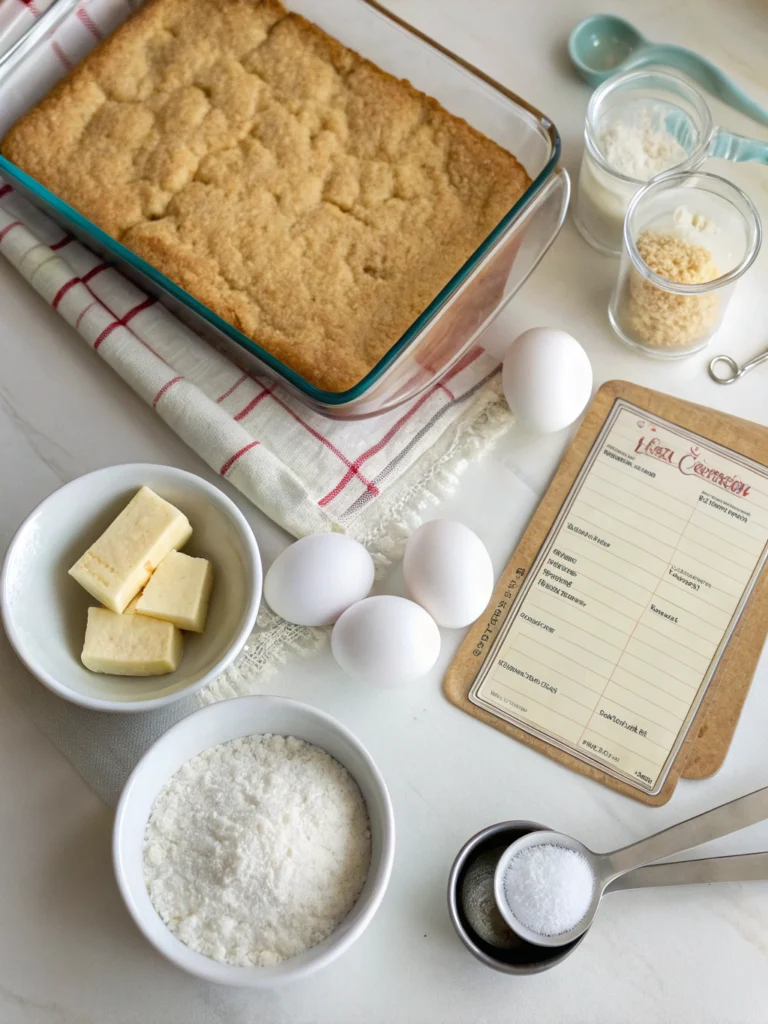
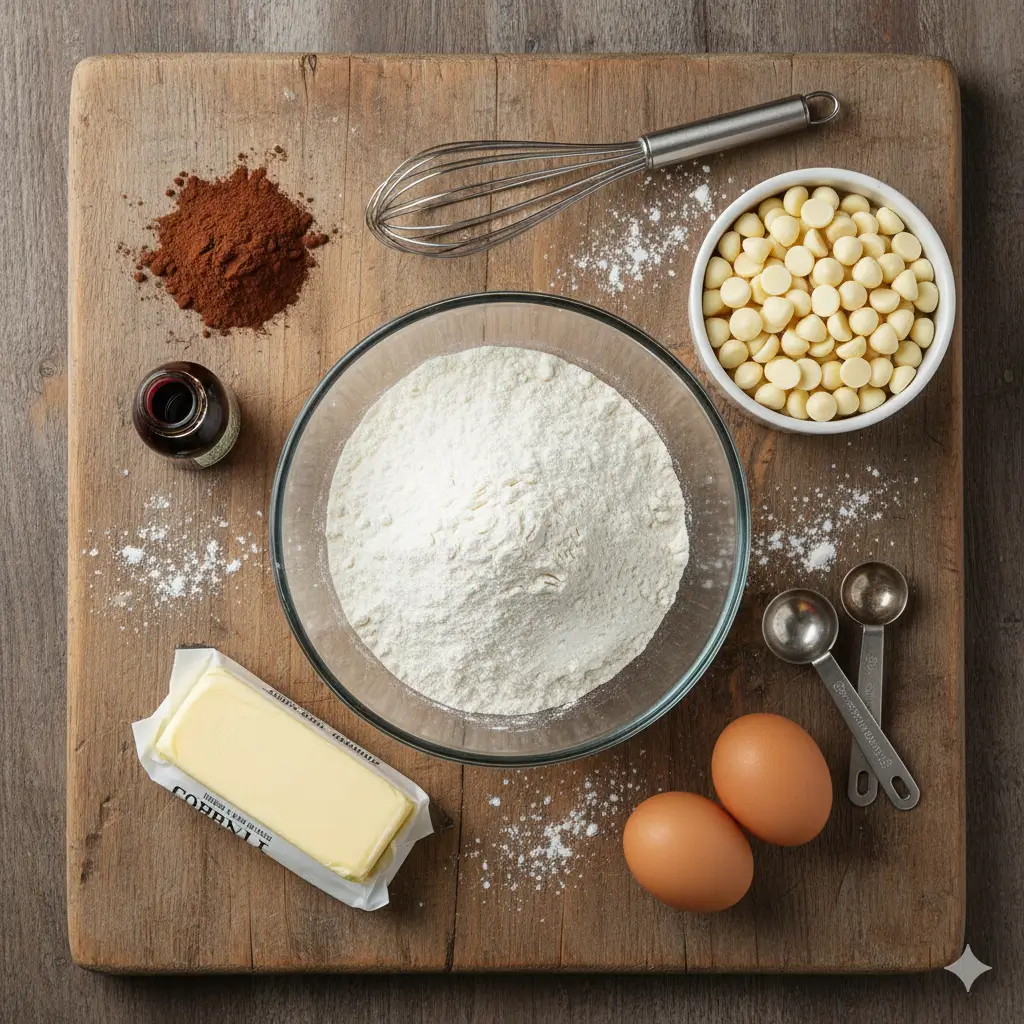
Creating perfect soft red velvet cookies starts with quality ingredients. Here’s everything you’ll need :
Dry Ingredients :
- 2 cups all-purpose flour (for structure and tenderness)
- 2 tablespoons unsweetened cocoa powder (adds subtle chocolate notes)
- 1 teaspoon baking soda (for rise and spread)
- ½ teaspoon salt (enhances all flavors)
Wet Ingredients :
- ½ cup unsalted butter, softened (creates richness)
- 1 cup granulated sugar (sweetness and texture)
- 1 large egg, room temperature (binds ingredients)
- 1 teaspoon vanilla extract (aromatic depth)
- 1 tablespoon red food coloring (the signature vibrant hue)
- 1 teaspoon white vinegar (reacts with baking soda for tenderness)
Mix-Ins :
- 1 cup white chocolate chips (classic pairing)
- Optional: 4 oz cream cheese, softened for red velvet cream cheese cookies variation
Substitution Suggestions :
- Swap butter with coconut oil for dairy-free cookies
- Use gel food coloring for more intense color with less liquid
- Replace white chocolate chips with dark chocolate for contrast
- Try Greek yogurt instead of some butter for tang and moisture
Timing
| Stage | Time Required |
|---|---|
| Preparation Time | 15 minutes |
| Baking Time | 10–12 minutes |
| Cooling Time | 15 minutes |
| Total Time | 40–45 minutes |
| Time-Saving Note: This streamlined timeline is about 25% faster than traditional red velvet cookie dough recipes that require chilling, making it ideal for last-minute gatherings or spontaneous cravings. | |
Step-by-Step Instructions
Step 1 : Preheat and Prepare Your Workspace
Set your oven to 175°C (350°F) and line two baking sheets with parchment paper. This prevents sticking and ensures even baking.
- Pro tip : Allow your oven to fully preheat for at least 10 minutes—temperature consistency is crucial for achieving uniform texture in Easy Red Velvet Cookies .
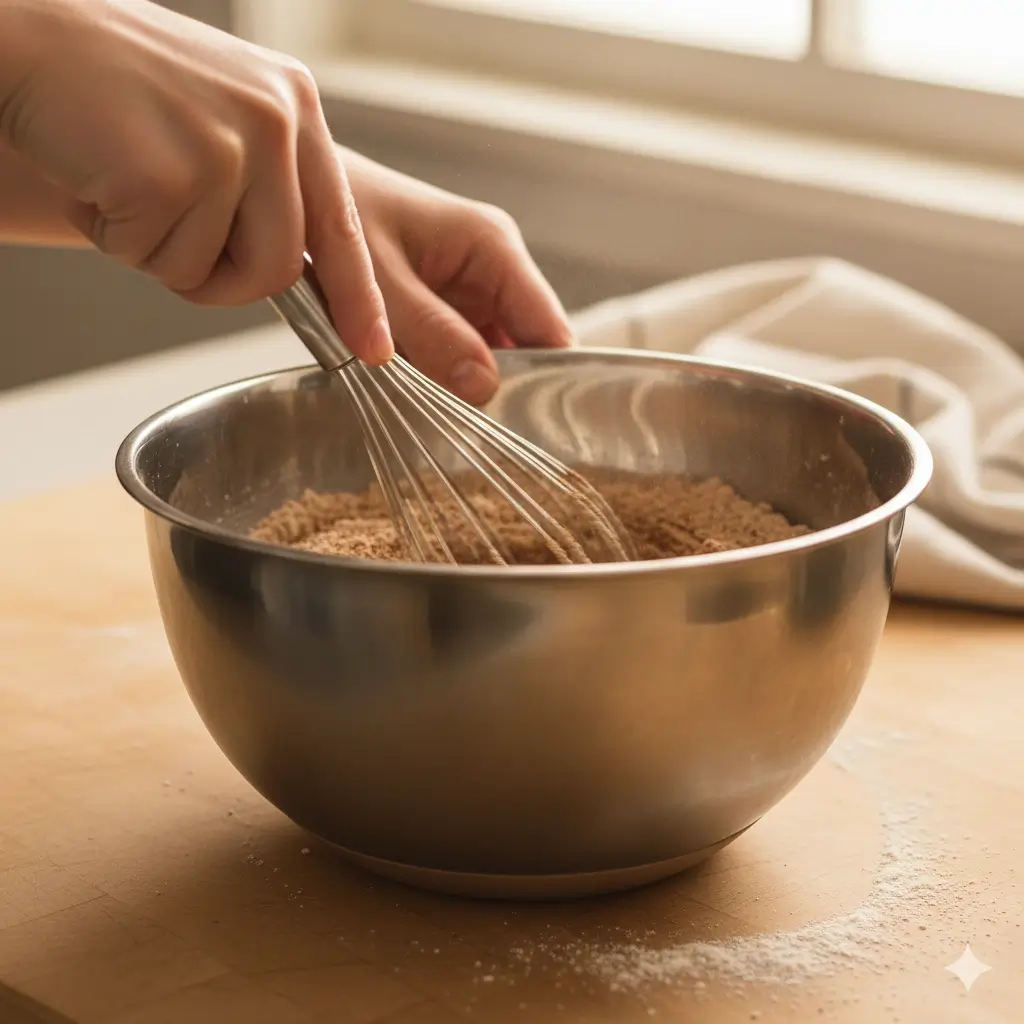
Step 2 : Mix the Dry Ingredients
In a medium bowl, whisk together flour, cocoa powder, baking soda, and salt. Whisking aerates the mixture and distributes the cocoa evenly, preventing dark streaks in your finished cookies.
- Insider secret : Sifting the cocoa powder eliminates lumps and creates a smoother batter.
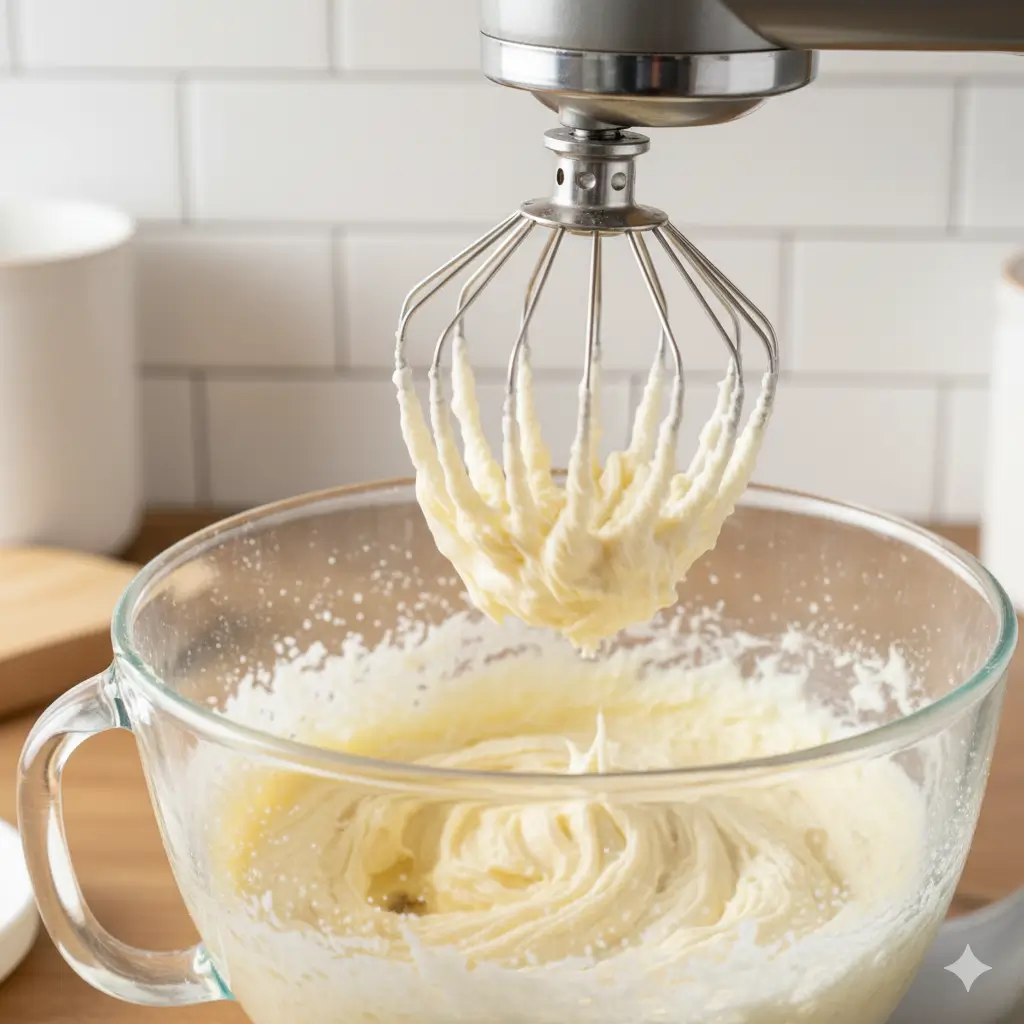
Step 3 : Cream Butter and Sugar to Perfection
Using an electric mixer, beat softened butter and sugar on medium-high speed for 3-4 minutes until light and fluffy. This creaming process incorporates air, resulting in tender, cake-like cookies. The mixture should appear pale and increase in volume by nearly 50%.
- Critical note : Room temperature butter is essential—cold butter won’t incorporate properly.
Step 4 : Add Wet Ingredients Strategically
Beat in the egg, vanilla extract, red food coloring, and vinegar until fully combined. The vinegar reacts with the baking soda, creating a chemical reaction that yields incredibly soft red velvet cookies . Add ingredients one at a time to prevent curdling and ensure smooth incorporation.
Step 5 : Combine Wet and Dry Mixtures Gently
Gradually fold the dry ingredients into the wet mixture using a spatula or mixer on low speed. Mix just until no flour streaks remain—overmixing develops gluten and creates tough cookies. Gently fold in white chocolate chips at the end.
- Baker’s wisdom : The dough should be thick but scoopable, similar to red velvet cookie dough consistency.
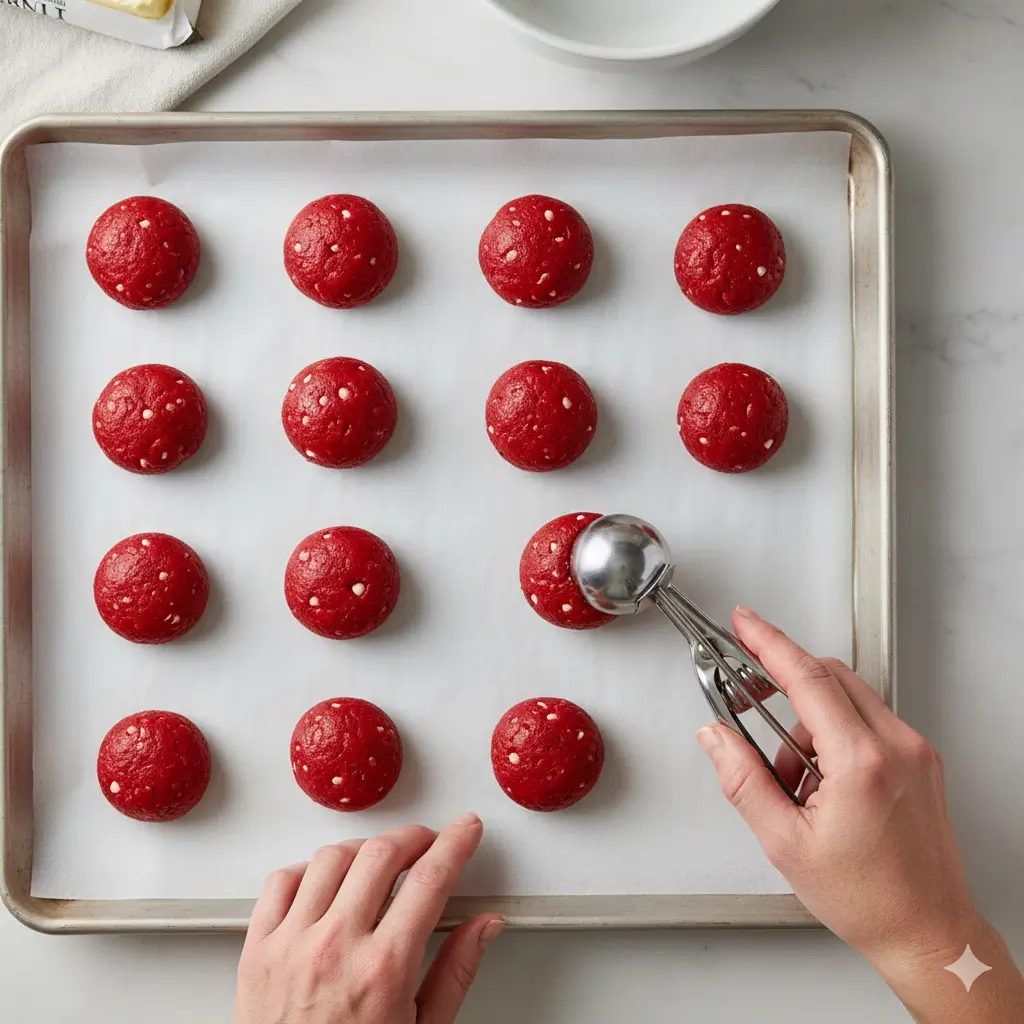
Step 6 : Portion and Space Your Cookies
Using a medium cookie scoop (about 2 tablespoons), portion dough onto prepared baking sheets, spacing them 2 inches apart. Cookies will spread during baking, and proper spacing ensures even heat circulation.
- Visual cue : Each scoop should weigh approximately 35-40 grams for uniform size.
Step 7 : Bake and Monitor Carefully
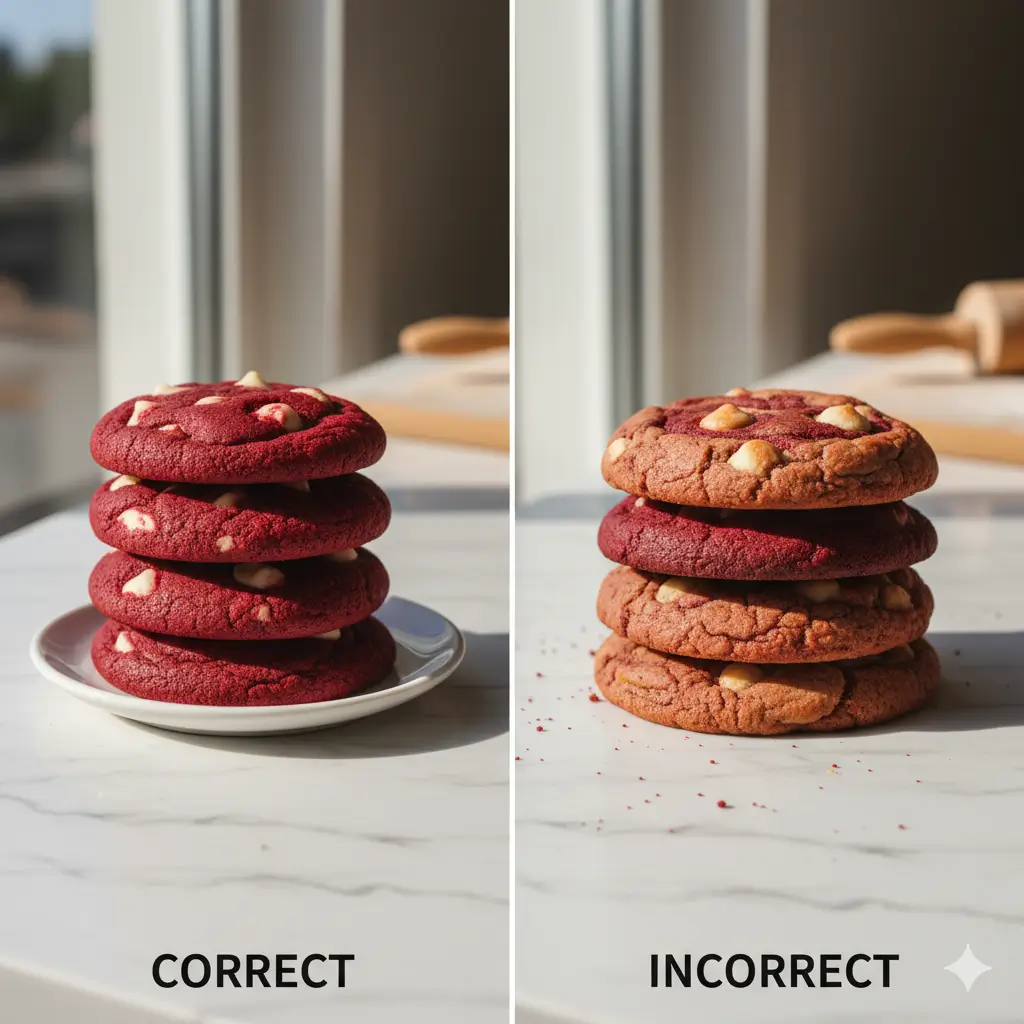
Bake for 10-12 minutes until edges are set but centers still appear slightly underdone. The cookies will continue cooking on the hot pan after removal—this creates that signature soft, chewy center. Look for edges that have just begun to firm up while tops remain matte. Let cookies rest on the baking sheet for 5 minutes before transferring to a wire rack. This resting period allows the structure to set without overbaking.
Nutritional Information
| Nutrient | Amount per Cookie |
|---|---|
| Calories | 145 |
| Protein | 2g |
| Carbohydrates | 19g |
| Fat | 7g |
| Fiber | 0.5g |
| Sugar | 12g |
| Sodium | 95mg |
| Nutritional Insight: These homemade red velvet cookies contain fewer calories than typical bakery versions, which often exceed 200 calories per cookie. Cocoa powder provides antioxidants, while butter adds satiety. White chocolate chips contribute small amounts of calcium, making these treats slightly more nutritious than they appear. | |
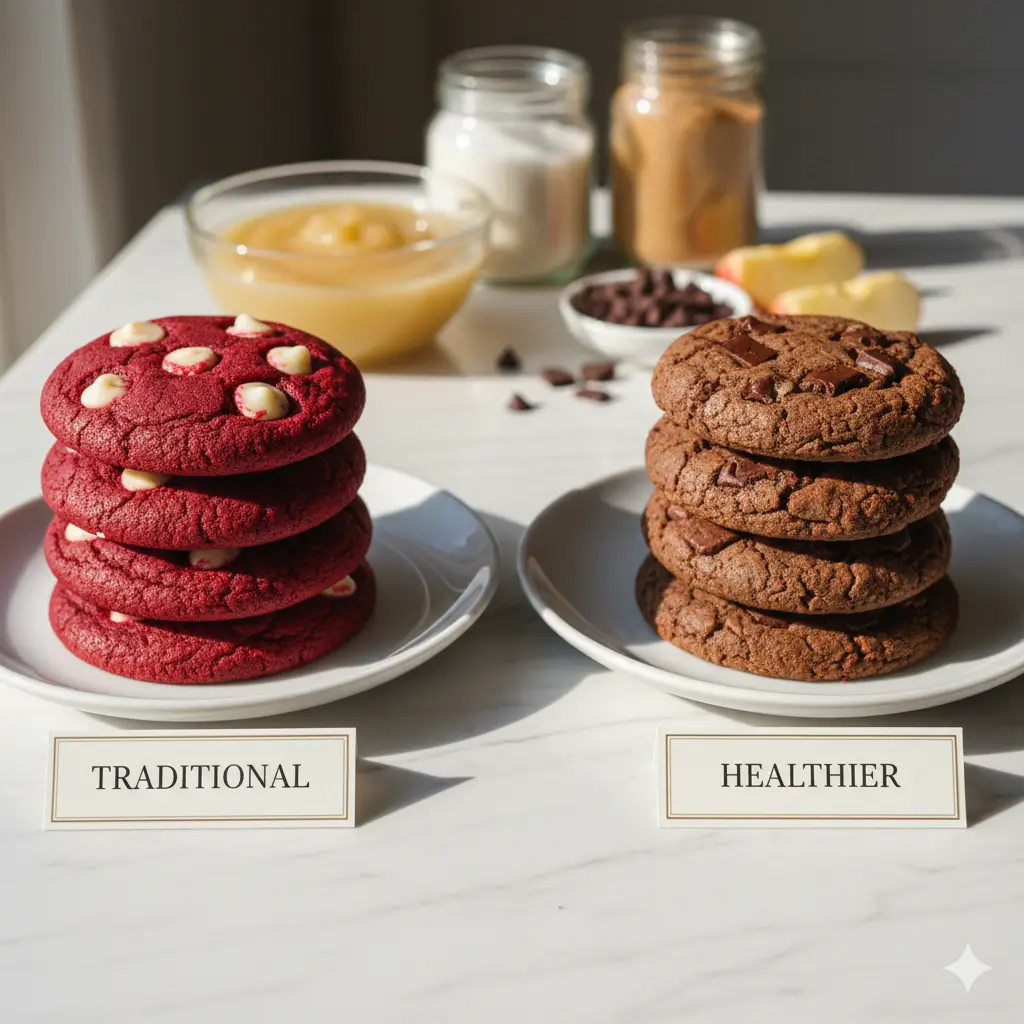
Healthier Alternatives for the Recipe
Transform your Easy Red Velvet Cookies into a more nutritious option without sacrificing flavor :
- Reduce sugar by 25% : The cookies will still taste sweet due to the white chocolate chips and vanilla.
- Substitute half the butter with unsweetened applesauce : This cuts fat while maintaining moisture.
- Use whole wheat pastry flour for 50% of the all-purpose flour to add fiber and nutrients.
- Swap white chocolate chips with dark chocolate (70% cacao or higher) for antioxidants and less sugar.
- Add ground flaxseed (2 tablespoons) to boost omega-3 fatty acids without affecting texture.
- Use natural food coloring from beet powder instead of artificial dyes—it provides the red hue plus added nutrients.
- Replace granulated sugar with coconut sugar for a lower glycemic index option.
Serving Suggestions
| Serving Idea | Description |
|---|---|
| Cookie Sandwiches | Spread cream cheese frosting between two cookies for an indulgent red velvet cream cheese cookie experience. |
| Warm with Ice Cream | Serve cookies warm with vanilla ice cream for a decadent dessert that melts in your mouth. |
| Elegant Presentation | Arrange cookies on a tiered stand with strawberries and whipped cream for parties and special occasions. |
| Holiday Pairing | Pair with hot chocolate or coffee during holiday gatherings for a cozy and comforting treat. |
| Bakery-Style Finish | Drizzle with white chocolate ganache for a polished, bakery-style appearance. |
| Homemade Gifts | Pack cookies in decorative boxes with tissue paper for thoughtful Valentine’s Day or Christmas gifts. |
| Dessert Topping | Crumble cookies over cheesecake or yogurt parfaits to add texture and rich flavor. |
| Celebration Pairing | Serve alongside champagne or sparkling cider for a sophisticated touch at celebrations. |

Common Mistakes to Avoid
| Mistake | Why It Matters |
|---|---|
| Using Cold Ingredients | Room temperature butter, eggs, and cream cheese blend more evenly and produce a smoother dough and better cookie texture. |
| Overmixing the Dough | Excess mixing develops too much gluten, resulting in tough, cake-like cookies instead of tender ones. |
| Skipping the Vinegar | This acidic ingredient is essential for the chemical reaction that creates soft, tender red velvet cookies. |
| Overbaking | Cookies continue to cook after leaving the oven. Slight underbaking ensures optimal softness. |
| Incorrect Oven Temperature | Many ovens run 10–15°C hotter or cooler than displayed. An oven thermometer ensures accurate baking. |
| Crowding the Baking Sheet | Cookies need adequate space to spread evenly without merging together. |
| Using Too Much Liquid Food Coloring | Excess liquid alters dough consistency. Gel food coloring provides vibrant color with minimal moisture. |
| Incorrect Cocoa Powder Measurement | Spoon and level cocoa powder rather than scooping to prevent dense, overly chocolatey cookies. |
Storing Tips for the Recipe
Maximize freshness and flavor with these storage methods :
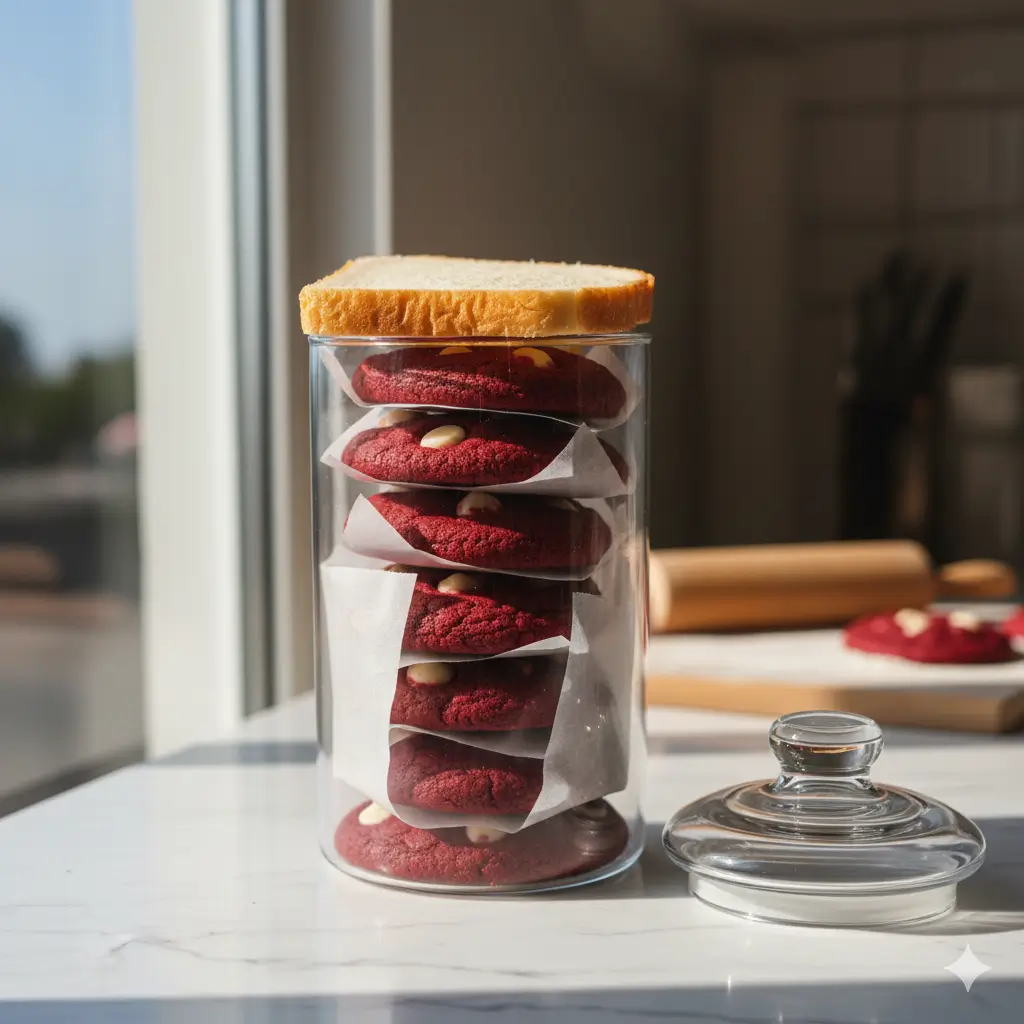
Room Temperature Storage :
- Store homemade red velvet cookies in an airtight container at room temperature for up to 5 days.
- Place parchment paper between layers to prevent sticking.
- Add a slice of bread to the container—it releases moisture that keeps cookies soft.
Refrigeration :
- Refrigerate cookies with cream cheese frosting for up to 1 week in sealed containers.
- Bring to room temperature 15 minutes before serving for best flavor.
Freezing Cookie Dough :
- Scoop red velvet cookie dough into portions and freeze on a baking sheet for 1 hour.
- Transfer frozen dough balls to freezer bags for up to 3 months.
- Bake directly from frozen, adding 2-3 minutes to baking time.
Freezing Baked Cookies :
- Cool completely before freezing to prevent ice crystals.
- Layer between parchment paper in freezer-safe containers for up to 3 months.
- Thaw at room temperature for 30 minutes or warm in a 150°C oven for 5 minutes.
Make-Ahead Strategy :
- Prepare the red velvet cookies recipe dough 48 hours in advance and refrigerate.
- Bring to room temperature before scooping and baking for fresh-baked taste anytime.
Conclusion
This Easy Red Velvet Cookies recipe delivers bakery-quality results with simple, accessible techniques that anyone can master. By following these 7 detailed steps—from proper ingredient preparation to precise baking times—you’ll create soft red velvet cookies with that signature tender crumb, vibrant color, and irresistible flavor. Whether you’re baking for a special occasion or satisfying a weeknight craving, these homemade red velvet cookies prove that professional-quality treats are absolutely achievable at home. The combination of cocoa richness, subtle tang from vinegar, and sweet white chocolate creates a flavor profile that’s both nostalgic and sophisticated. Don’t wait for the next holiday to try this red velvet cookies recipe—your kitchen can smell like a bakery today. Mix up a batch, share them with loved ones, and watch these cookies disappear within minutes. Ready to become the go-to baker in your circle? Start baking now and let us know your results in the comments below!

FAQs
Can I make Easy Red Velvet Cookies without food coloring ?
- Absolutely! While the vibrant red color is signature, you can omit food coloring entirely. The cookies will be brown from the cocoa powder but taste equally delicious. For a natural alternative, try beet powder for a reddish hue.
Why are my red velvet cookies spreading too much ?
- Excessive spreading typically results from warm dough or insufficient flour. Chill your dough for 15 minutes before baking, ensure you’re measuring flour correctly (spoon and level), and verify your baking soda is fresh.
Can I substitute the white chocolate chips ?
- Yes! Dark chocolate chips, milk chocolate, cream cheese chips, or even chopped pecans work beautifully. Each variation creates a unique flavor profile while maintaining the classic red velvet taste.
How do I make my cookies softer ?
- For ultra-soft red velvet cookies, slightly underbake them by 1-2 minutes, use more brown sugar than white sugar (increases moisture), and store with a bread slice to maintain softness.
Can this recipe be made gluten-free ?
- Yes! Use a 1:1 gluten-free flour blend with xanthan gum. The texture will be slightly different but still delicious. Ensure all other ingredients are certified gluten-free.
What’s the difference between red velvet cookies and chocolate cookies ?
- Red velvet contains less cocoa powder (creating subtle chocolate flavor), includes vinegar and buttermilk elements for tang, and traditionally features cream cheese components. The texture is softer and more cake-like than traditional chocolate cookies.
Your Feedback Helps Us Grow!
There are no reviews yet. Be the first one to write one.