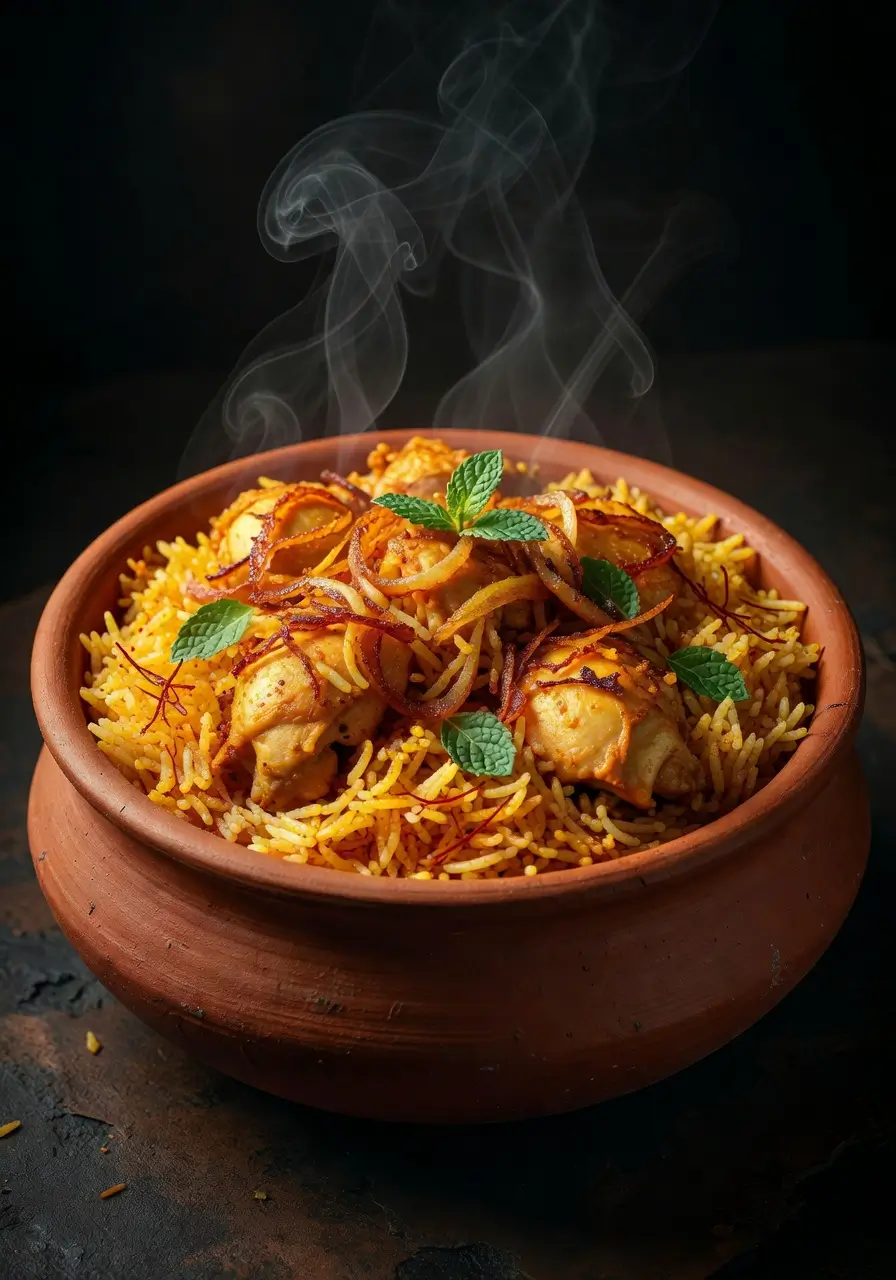
Easy Chicken Biryani Recipe (Restaurant Style!)
Table of Contents
Introduction :
Craving that aromatic, flavorful chicken biryani from your favorite Indian restaurant? You’re not alone! Biryani is one of the most beloved dishes in Indian cuisine, with its fragrant basmati rice, tender spiced chicken, and layers of incredible flavor. But here’s the good news—you don’t need to order takeout or spend hours in the kitchen to enjoy authentic chicken biryani at home.
This easy chicken biryani recipe simplifies the traditional method without sacrificing any of the authentic taste. Originally created in the royal kitchens of the Mughal Empire, biryani has evolved into countless regional variations across India and Pakistan. While traditional recipes can be intimidating with their complex layering techniques and elaborate “dum” (steam cooking) process, this recipe uses a streamlined one-pot method that delivers restaurant-quality results in just about 60 minutes.
What makes this recipe truly special? It combines the authentic flavors of Hyderabadi-style biryani with beginner-friendly techniques. You’ll get perfectly cooked, separate grains of rice, juicy chicken infused with aromatic spices, and that signature golden color from saffron—all without needing professional cooking skills or hard-to-find ingredients.
Whether you’re cooking for a special occasion, meal prepping for the week, or simply want to impress your family with an exotic homemade meal, this easy chicken biryani recipe will become your go-to dish. Ready in under two hours (including marinating time), it serves 6 people and pairs beautifully with cooling raita and crispy papad.
Let’s dive into creating this showstopping dish that’ll have everyone asking for seconds!
Why This Easy Chicken Biryani Recipe Works
Before we get cooking, let’s talk about what makes this recipe foolproof, even for complete beginners :
✅ Simplified One-Pot Method : Traditional biryani requires cooking rice and chicken separately, then carefully layering them in a heavy pot for dum cooking. This recipe streamlines the process while maintaining authentic flavor, making it perfect for weeknight dinners.
✅ Pre-Made Biryani Masala Option : While you can certainly make your own spice blend, using store-bought biryani masala saves time without compromising taste. Look for brands like Shan, National, or MDH at your local Indian grocery store.
✅ Perfect Rice-to-Chicken Ratio : One of the biggest mistakes in homemade biryani is getting the proportions wrong. This recipe uses the ideal 2:1 ratio that ensures every bite has both tender chicken and fragrant rice.
✅ Foolproof Cooking Technique : The parboiling method for rice prevents the dreaded mushy texture that ruins many biryani attempts. You’ll learn exactly when to stop cooking the rice for perfect results.
✅ Ready in 60 Minutes : Unlike traditional recipes that take 3+ hours, this simplified version delivers authentic taste in a fraction of the time—perfect for busy weeknights or last-minute dinner parties.
✅ Beginner-Friendly Instructions : Each step is broken down with clear explanations, common pitfalls to avoid, and helpful tips that guarantee success even on your first attempt.
The secret to great biryani isn’t complexity—it’s understanding a few key principles and following them consistently. This recipe teaches you those principles while making the process as simple as possible.
Ingredients for Easy Chicken Biryani
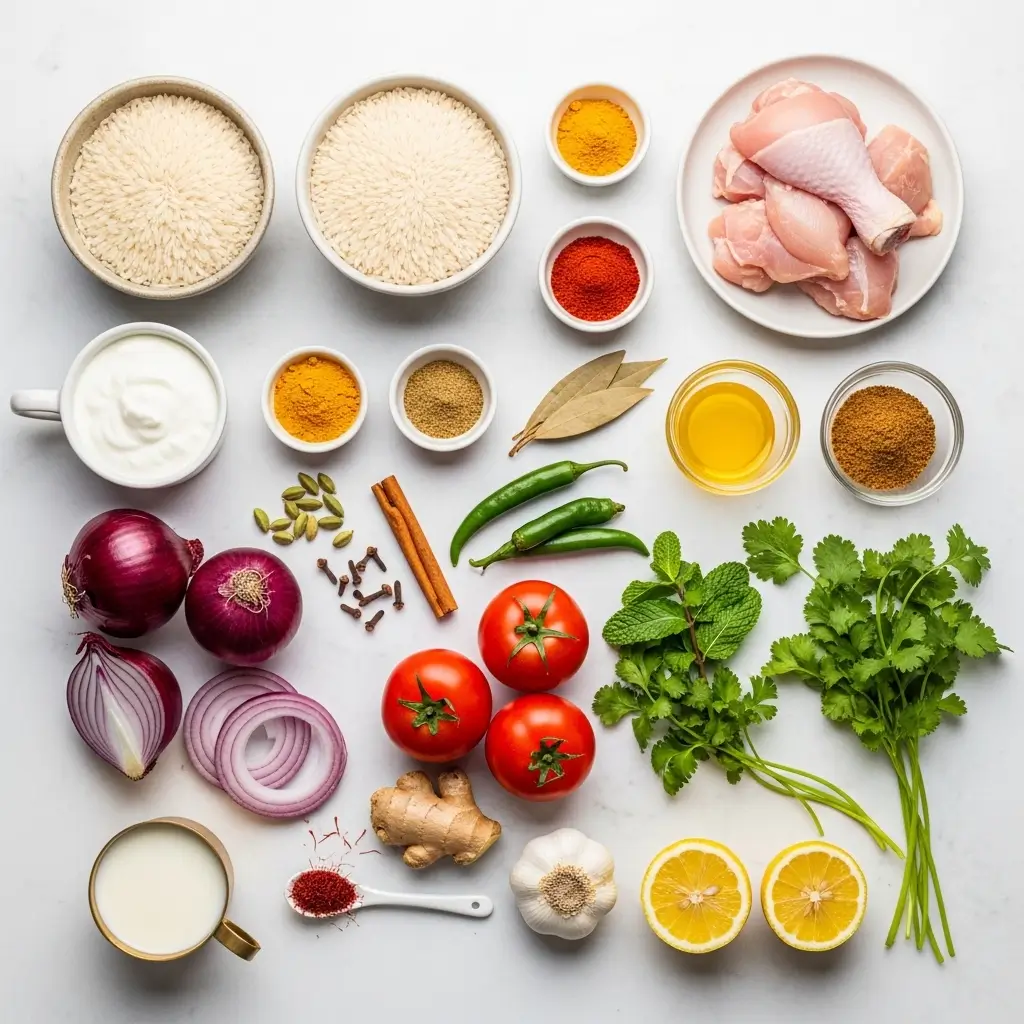
For the Chicken Marinade :
- 1 lb boneless chicken (thighs or breast, cut into 2-inch pieces)
- 1 cup plain yogurt (full-fat works best)
- 1 tablespoon ginger-garlic paste (or 1 tbsp fresh grated ginger + 3 minced garlic cloves)
- 1 teaspoon red chili powder (adjust to your heat preference)
- ½ teaspoon turmeric powder
- 1 teaspoon salt (or to taste)
- 1 tablespoon lemon juice (freshens the marinade)
For the Basmati Rice :
- 2 cups aged basmati rice (aged rice gives better texture)
- 4 cups water (for parboiling)
- 2 bay leaves
- 4-5 green cardamom pods
- 1-inch cinnamon stick
- 3-4 whole cloves
- 1 teaspoon salt
For the Biryani :
- 3 tablespoons ghee or vegetable oil (ghee adds authentic flavor)
- 2 large onions (thinly sliced into half-moons)
- 2 medium tomatoes (chopped)
- ¼ cup fresh mint leaves (roughly chopped)
- ¼ cup fresh cilantro (roughly chopped)
- 2-3 green chilies (slit lengthwise)
- 1 tablespoon biryani masala powder
- ½ teaspoon garam masala
- Pinch of saffron threads (soaked in 2 tablespoons warm milk for 10 minutes)
- ½ cup fried onions (for garnish—store-bought saves time)
- 2 tablespoons warm milk (for saffron)
Optional Additions :
- 2 hard-boiled eggs (halved, for serving)
- ½ cup rose water (for authentic fragrance)
- ⅓ cup cashews and raisins (fried in ghee)
Equipment Needed:
- Heavy-bottomed pot with tight-fitting lid (5-6 quart capacity)
- Large mixing bowl
- Fine-mesh strainer
- Aluminum foil (for sealing)
How to Make Easy Chicken Biryani (Step-by-Step)

Step 1: Marinate the Chicken ⏱️ 30 minutes (or up to overnight)
In a large mixing bowl, combine the chicken pieces with yogurt, ginger-garlic paste, red chili powder, turmeric, salt, and lemon juice. Mix thoroughly, ensuring every piece is well-coated with the marinade. The yogurt serves a dual purpose: it tenderizes the chicken while creating a rich, creamy base for the sauce.
Cover the bowl with plastic wrap and refrigerate for at least 30 minutes. For deeper flavor penetration, marinate for 2-4 hours or even overnight. The longer marination creates more tender, flavorful chicken.
- Pro Tip : If you’re short on time, make small slits in the chicken pieces before marinating. This allows the spices to penetrate faster, giving you good results even with a shorter marinating time.
Step 2: Prepare Basmati Rice ⏱️ 20 minutes
Rinse the basmati rice under cold running water 3-4 times until the water runs clear. This removes excess starch and prevents sticky, clumpy rice. Soak the rinsed rice in fresh water for 20 minutes—this step is crucial for achieving long, separate grains.
While the rice soaks, bring 4 cups of water to a rolling boil in a large pot. Add bay leaves, cardamom pods, cinnamon stick, cloves, and salt. The whole spices infuse the rice with subtle aromatic flavors.
Drain the soaked rice and add it to the boiling spiced water. Cook on high heat for 5-6 minutes until the rice is 70% cooked—the grains should still have a slight bite in the center when you test them. This is the most critical step in biryani making!
How to Test : Take a grain of rice and press it between your fingers. It should break but still have a tiny firm core in the middle.
Immediately drain the rice in a fine-mesh strainer and set aside. Don’t rinse with cold water—we want to keep the rice warm for layering.
- Pro Tip : Slightly undercooked rice is better than overcooked. The rice will finish cooking during the dum process, so err on the side of firmer rice.
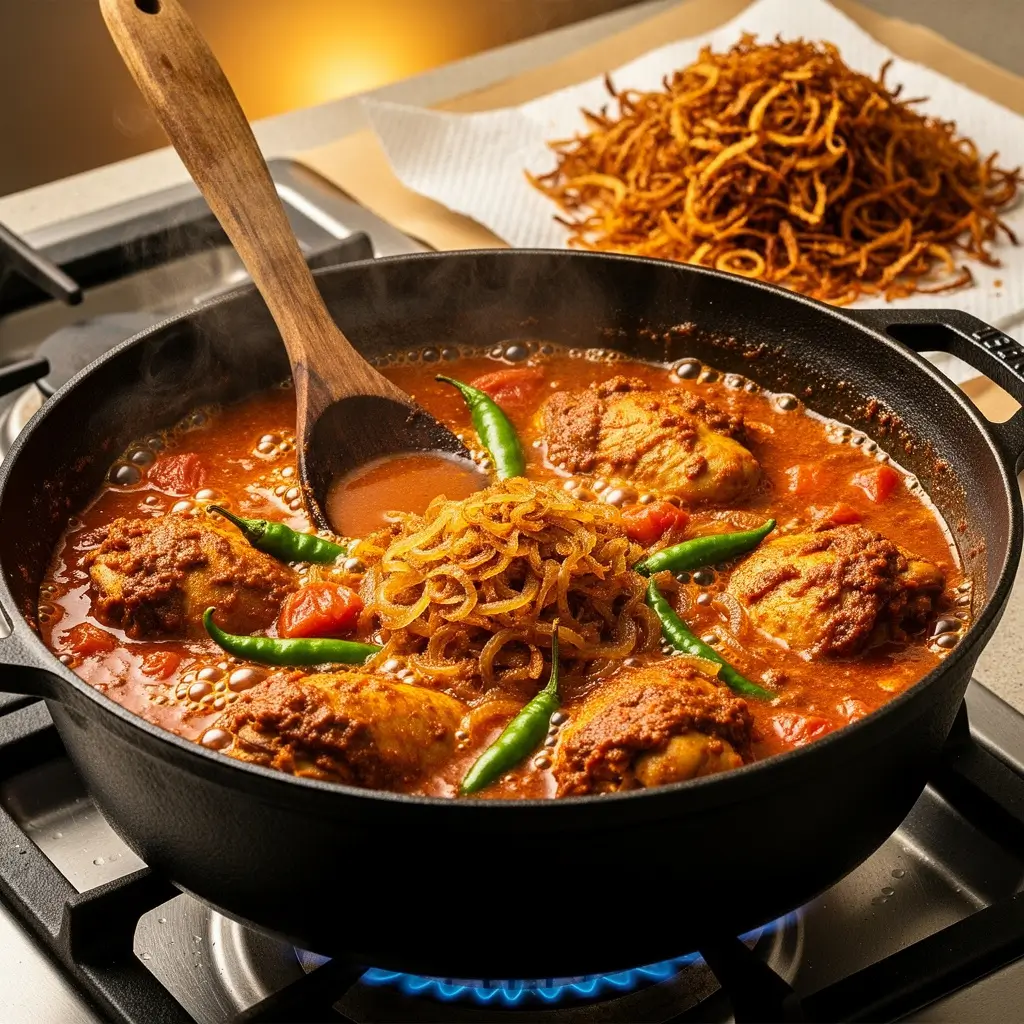
Step 3: Fry the Onions ⏱️ 10-12 minutes
Heat 3 tablespoons of ghee or oil in your heavy-bottomed pot over medium-high heat. Add the sliced onions and fry, stirring frequently, until they turn deep golden brown. This takes patience—about 10-12 minutes—but it’s worth it. These caramelized onions (called “birista”) are essential for authentic biryani flavor.
Time-Saving Hack : You can use store-bought fried onions (available at Indian grocery stores) and skip this step entirely. Keep a portion for garnish and mix the rest into the cooking process.
Remove half of the fried onions with a slotted spoon and drain them on paper towels. Reserve these for garnishing the finished biryani. Leave the remaining onions in the pot with the oil.
- Pro Tip : Don’t let the onions burn! They should be deep golden-brown, not dark brown or black. Burnt onions will make your biryani bitter.
Step 4: Cook the Marinated Chicken ⏱️ 15-18 minutes
In the same pot with the remaining fried onions and oil, add the marinated chicken along with all the marinade. Increase heat to medium-high and cook, stirring occasionally, for 5 minutes until the chicken starts to change color.
Add the chopped tomatoes, biryani masala powder, garam masala, and green chilies. Stir well to combine. Cook for another 8-10 minutes, stirring occasionally, until the chicken is about 80% cooked and the oil begins to separate from the masala. You’ll notice the mixture looking less watery as the tomatoes break down.
Add half of the chopped mint and cilantro. Mix gently. The chicken should be sitting in a thick, aromatic gravy—not too dry, not too watery.
- Pro Tip : If your gravy seems too dry, add 2-3 tablespoons of water. If it’s too watery, cook uncovered for a few extra minutes to evaporate excess moisture.
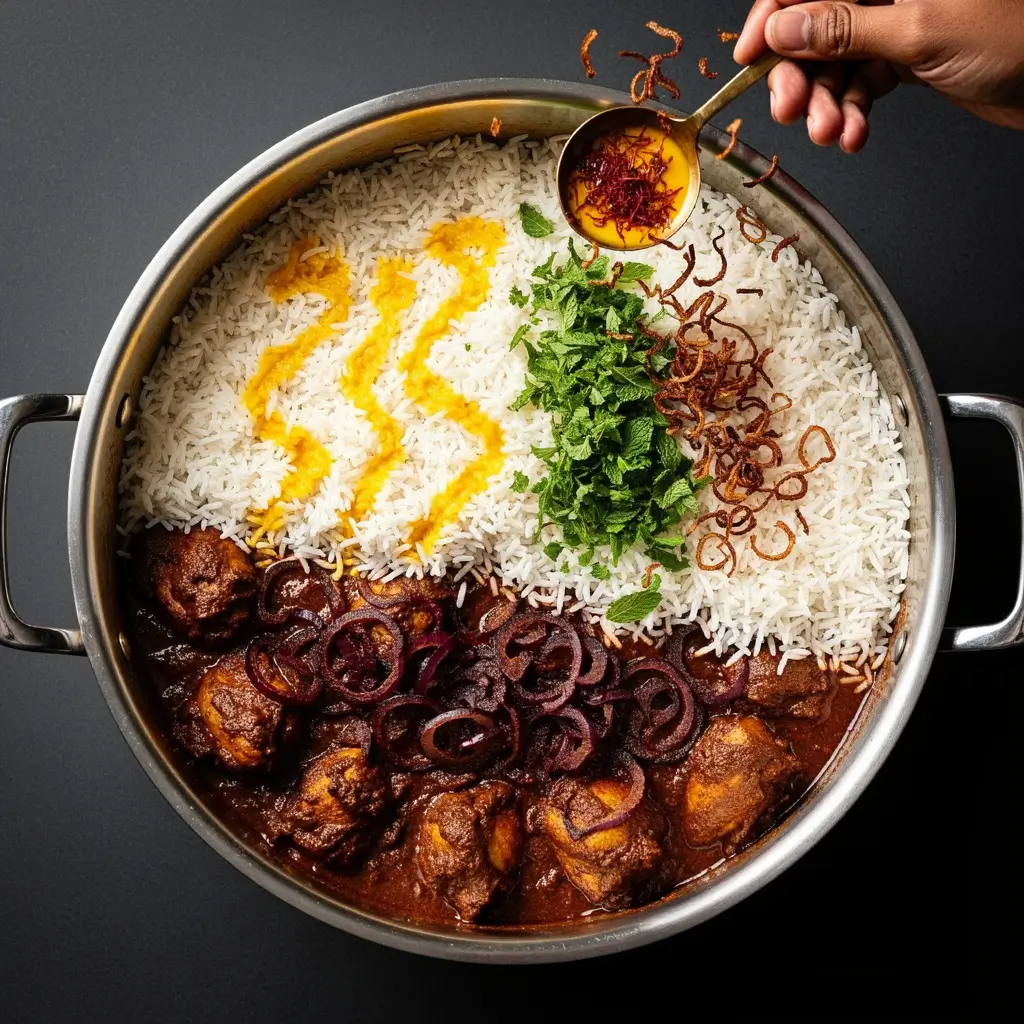
Step 5: Layer the Biryani ⏱️ 5 minutes
Now comes the fun part—creating the signature biryani layers! This technique, called “layering,” ensures every spoonful has rice, chicken, and aromatic garnishes.
- First Layer : Spread the cooked chicken mixture evenly across the bottom of the pot.
- Second Layer : Gently spread half of the parboiled rice over the chicken. Don’t press down—keep it light and fluffy.
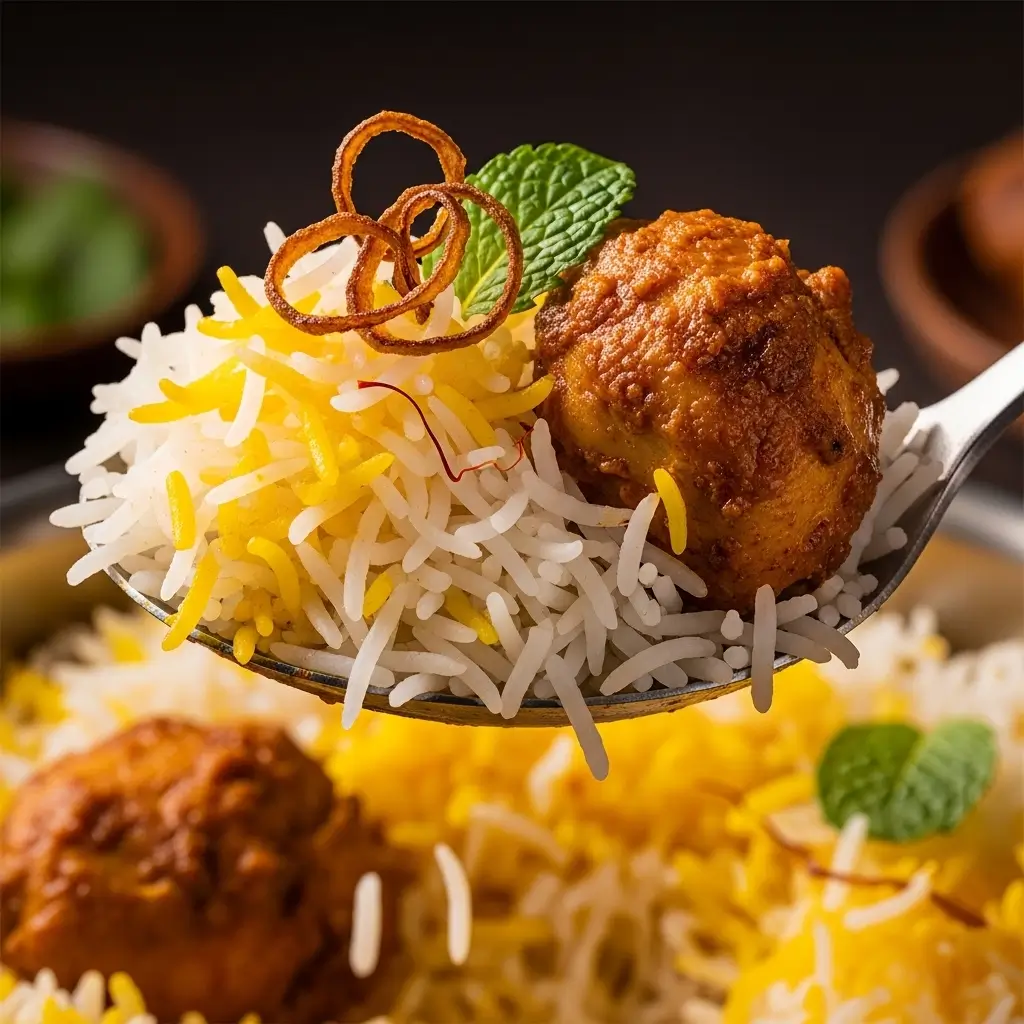
- Garnish Layer : Sprinkle half of the remaining mint and cilantro over the rice. Drizzle half of the saffron-infused milk in a crisscross pattern (this creates the beautiful golden streaks). Scatter some of the reserved fried onions.
- Third Layer : Add the remaining rice in an even layer.
- Final Garnish : Top with the remaining mint, cilantro, saffron milk, and generously sprinkle the reserved fried onions. For extra richness, you can add small dollops of ghee on top.
- Pro Tip : Use the back of a spoon to gently create small wells in the rice layers. When you pour the saffron milk into these wells, it distributes better throughout the biryani.
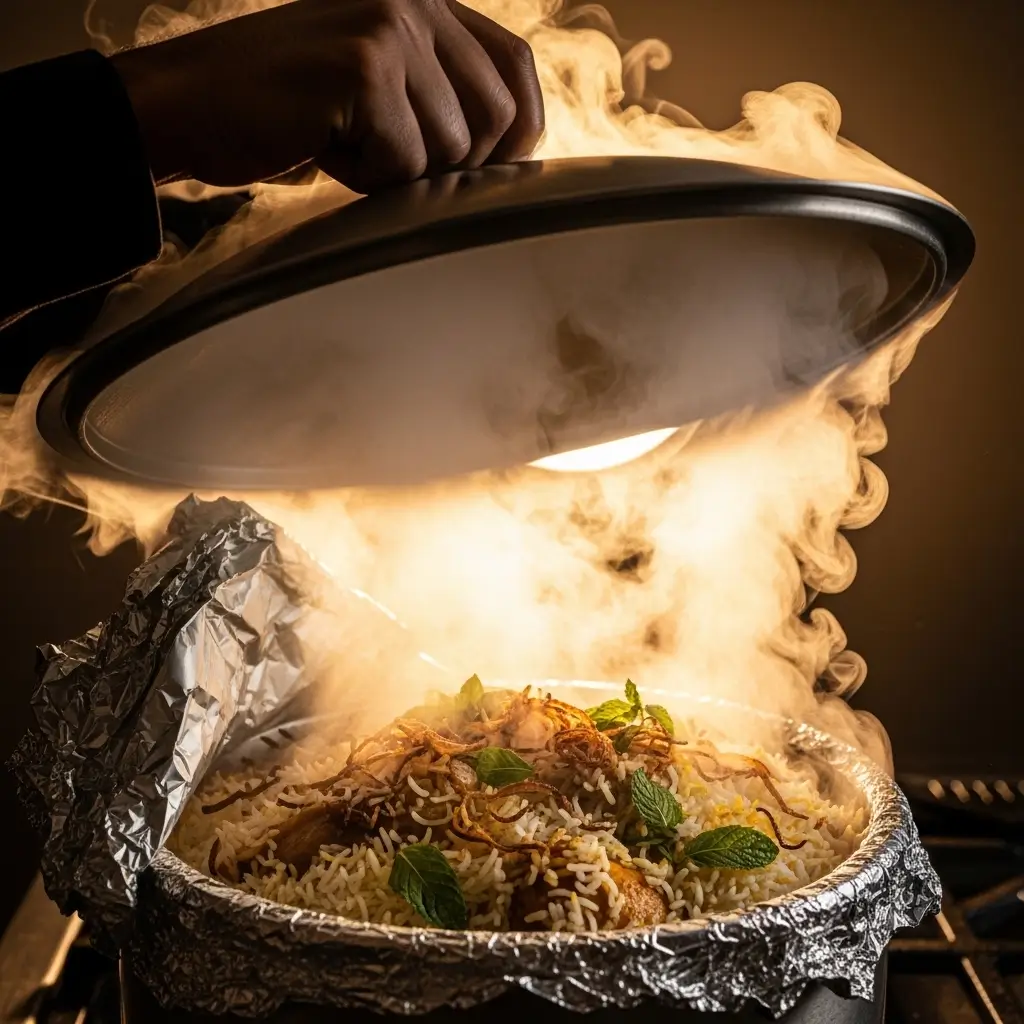
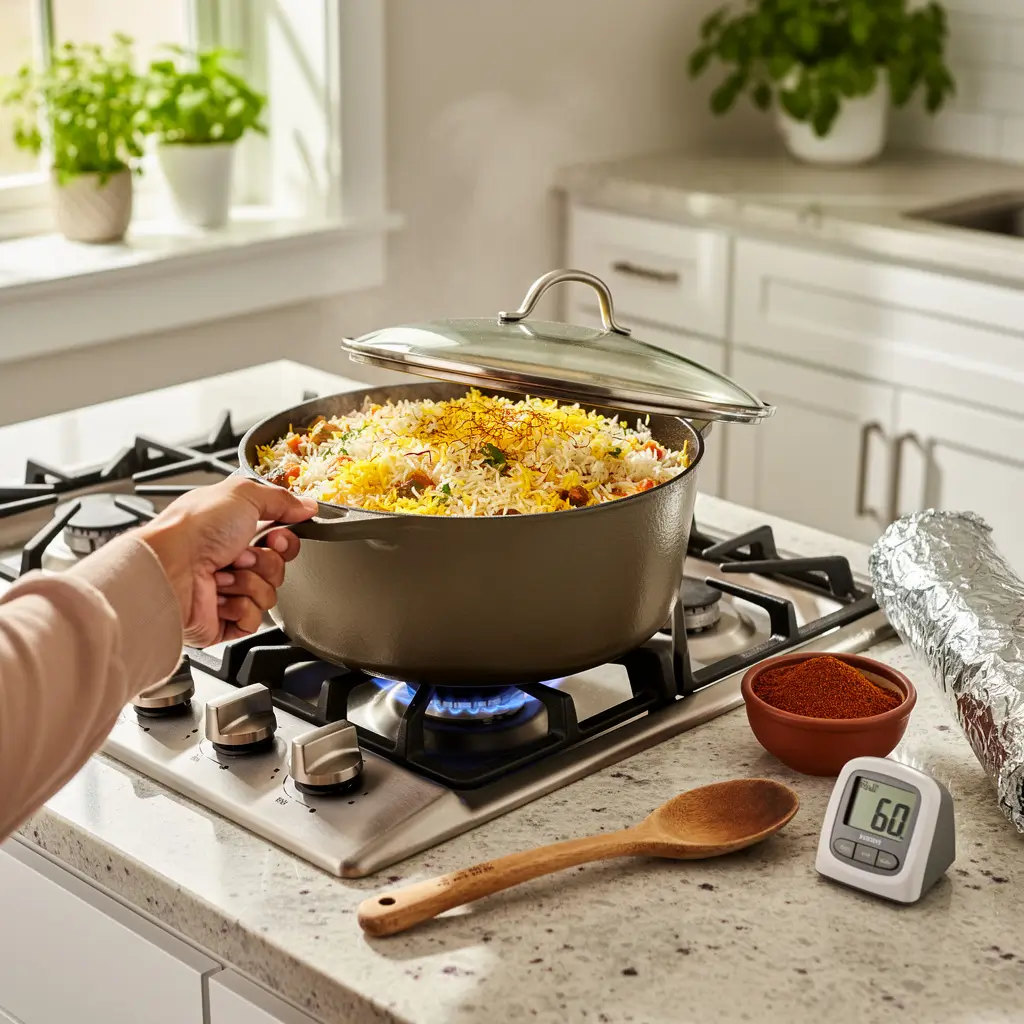
Step 6: Dum Cooking (Simplified Method) ⏱️ 20-25 minutes
This is where the magic happens! Dum cooking involves steaming the layered biryani on very low heat, allowing all the flavors to meld together while the rice finishes cooking.
Cover the pot with a large piece of aluminum foil, pressing it down around the edges to create a seal. Then place your pot lid tightly over the foil. This double-sealing method traps all the steam inside.
- Traditional Method : In authentic dum cooking, a wheat dough is used to seal the pot completely. The foil method achieves similar results with less fuss.
Place the sealed pot on the lowest heat setting on your stovetop. Cook for 20-25 minutes. During this time :
- The rice will finish cooking to perfection
- The chicken will complete cooking and become incredibly tender
- All the flavors will infuse together
- The saffron will create beautiful golden streaks
The Golden Rule : DO NOT open the lid during dum cooking! Resist the temptation to peek. Every time you open it, you lose precious steam.
After 20-25 minutes, turn off the heat but leave the pot covered for an additional 5 minutes. This resting period allows the rice to set properly.
- Pro Tip : If you’re worried about burning, you can use a heat diffuser (tawa) under the pot, or create your own by placing the pot on an upside-down flat griddle.
Step 7: Fluff and Serve ⏱️ 2-3 minutes
The moment of truth! Carefully remove the lid and foil (watch out for hot steam). The aroma should be absolutely incredible—fragrant spices, saffron, and caramelized onions.
Using a flat spatula or large spoon, gently fluff the biryani from the bottom up, bringing the chicken to the surface. The goal is to mix the layers slightly while keeping the rice grains intact and separate. Use a light touch—don’t stir vigorously or you’ll break the delicate rice grains.
- Serving Presentation : Transfer the biryani to a large serving platter. Arrange some chicken pieces on top, garnish with additional fried onions, a sprinkle of fresh cilantro, and a few lime wedges on the side.
- Pro Tip : For the perfect Instagram-worthy presentation, serve the biryani in individual clay pots or small casseroles, topped with a hard-boiled egg half, fried onions, and fresh herbs.
Pro Tips for Perfect Chicken Biryani Every Time
After making biryani hundreds of times, here are the expert tips that make the difference between good and extraordinary :
💡 Use Aged Basmati Rice : Rice that’s been aged for at least a year has lower moisture content, which means longer, more separate grains. Look for brands like “India Gate,” “Tilda,” or “Royal” labeled as aged or extra-long grain.
💡 Don’t Skip the Saffron : Yes, saffron is expensive, but a little goes a long way. It provides the authentic golden color and distinctive aroma that defines restaurant-style biryani. If budget is a concern, use half the amount or substitute with a pinch of turmeric mixed in milk (though the flavor won’t be identical).
💡 Marinate Minimum 30 Minutes : The yogurt marinade tenderizes the chicken and builds flavor. While 30 minutes works, 2-4 hours is ideal, and overnight is best for maximum tenderness.
💡 Parboil Rice to 70% Only : This cannot be overstated! Overcooked rice at this stage will turn mushy during dum cooking. When in doubt, slightly undercook—the rice will continue cooking during steaming.
💡 Low Heat for Dum is Essential : High heat will burn the bottom layer of rice while leaving the top undercooked. The lowest setting on your stovetop is what you want—gentle, consistent steam.
💡 Let It Rest Before Serving : After dum cooking, leaving the pot covered for 5 minutes allows the steam to redistribute and the rice to firm up. This makes it easier to serve without the rice clumping together.
💡 Make Extra Fried Onions : They’re incredibly addictive and can be stored in an airtight container for up to 2 weeks. Use them as garnish for other dishes too!
💡 Quality of Spices Matters : Fresh, high-quality biryani masala makes a noticeable difference. If your spices have been sitting in the cabinet for years, they’ve likely lost much of their potency. Invest in fresh spices or whole spices you grind yourself.
💡 Heavy-Bottomed Pot is Non-Negotiable : Thin pots distribute heat unevenly and are more likely to burn the bottom. A heavy Dutch oven or traditional biryani handi works best.
💡 Adjust Spice Level to Your Preference : Indian cuisine is flexible! If you’re sensitive to heat, reduce the red chili powder and green chilies. For spice lovers, add more or include some hot chili paste.
Variations of Easy Chicken Biryani
Once you’ve mastered this basic recipe, try these delicious variations :
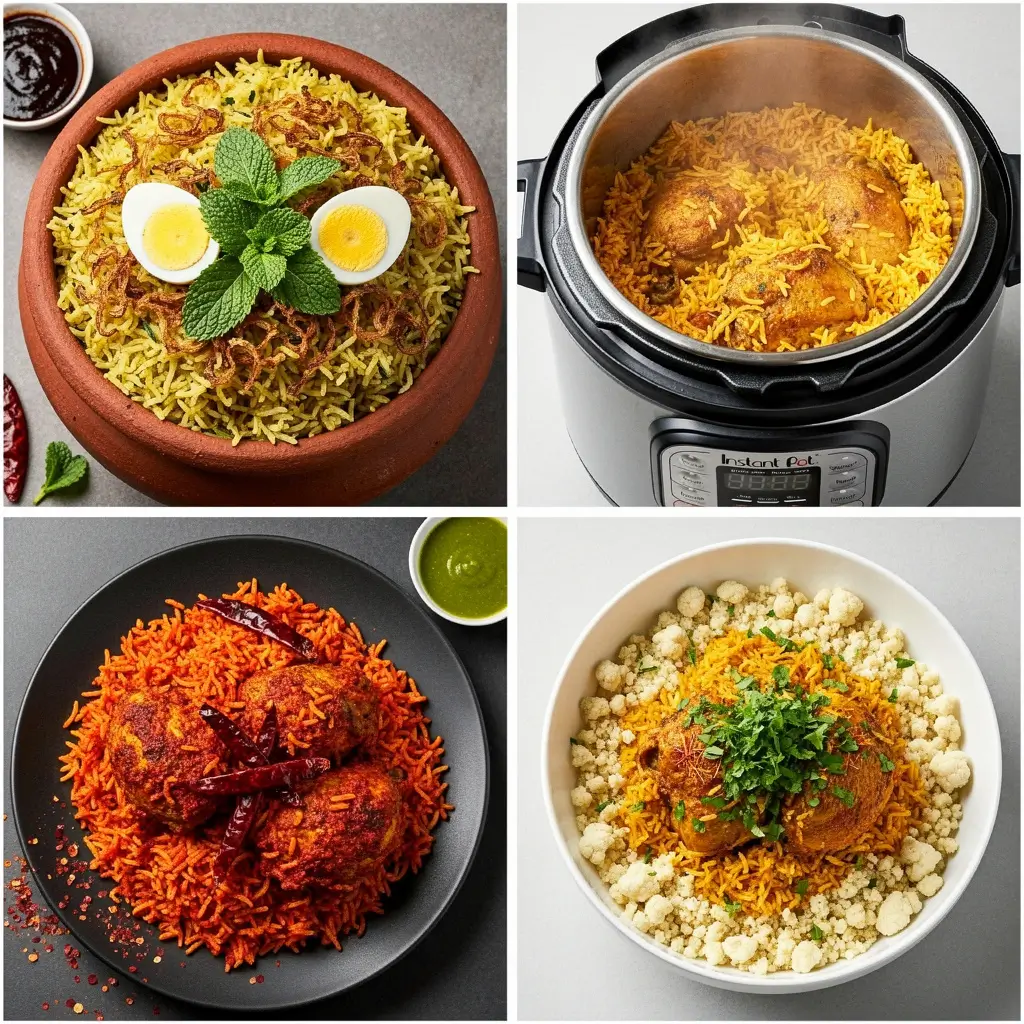
Hyderabadi Style Chicken Biryani
The Hyderabadi version is known for its tangy flavor profile. Add 2 tablespoons of tamarind paste or 1 tablespoon of lime juice to the chicken marinade. Use more mint leaves and reduce cilantro. Traditionally, this style also includes boiled eggs and uses kewra (screwpine) water instead of rose water. The chicken is often cooked with bone-in pieces for deeper flavor.
Instant Pot Chicken Biryani
Short on time? The pressure cooker method cuts cooking time in half! Layer ingredients as directed, but instead of dum cooking on the stovetop, set your Instant Pot to manual/pressure cook mode for 6 minutes on high pressure. Allow natural pressure release for 10 minutes, then quick release any remaining pressure. This method works beautifully and is perfect for busy weeknights.
Spicy Chicken Biryani
For serious heat lovers, increase red chili powder to 2 teaspoons, add 4-6 green chilies, and include 1 tablespoon of hot chili paste in the marinade. You can also make a spicy garnish by frying dried red chilies in ghee and sprinkling them on top before serving.
Keto/Low-Carb Chicken Biryani
Replace basmati rice with cauliflower rice for a low-carb version. Use the same spices and chicken preparation, but add the cauliflower rice in the last 5 minutes of cooking (it doesn’t need parboiling). This version has all the flavor with a fraction of the carbs—perfect for those watching their carbohydrate intake.
Dum Biryani with Bone-In Chicken
For more authentic flavor, use bone-in chicken pieces (thighs and drumsticks). The bones add richness to the sauce and the meat becomes incredibly tender. Increase cooking time in Step 4 by 5-10 minutes to ensure the chicken cooks through completely.
Vegetarian Biryani
Replace chicken with mixed vegetables (potatoes, carrots, beans, cauliflower, peas), paneer cubes, or chickpeas. Follow the same method, adjusting cooking times as vegetables cook faster than meat.
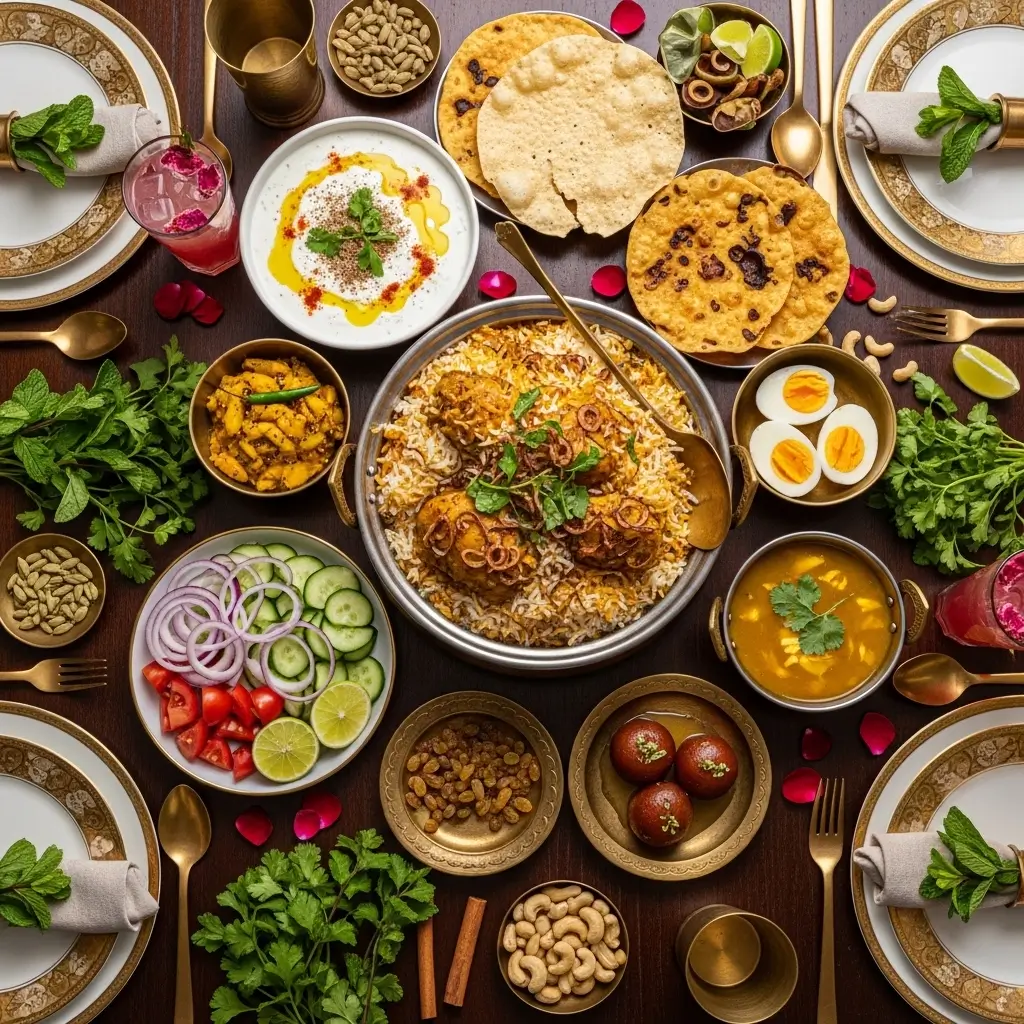
What to Serve with Chicken Biryani
| Side Dish | Description |
|---|---|
| Raita (Yogurt Sauce) | A cooling and creamy contrast to spiced biryani. Options include cucumber raita, boondi raita, or plain yogurt whisked with roasted cumin powder and salt. The dairy helps balance the heat and supports digestion. |
| Kachumber Salad | A refreshing chopped salad made with cucumbers, tomatoes, onions, and cilantro tossed with lime juice. It adds a crisp and bright contrast to the rich biryani. |
| Papad (Crispy Lentil Crackers) | Roasted or fried papad provides a satisfying crunch. Break pieces over your biryani for extra texture and flavor. |
| Boiled Eggs | Halved hard-boiled eggs are a traditional garnish for biryani and add extra protein to the meal. |
| Pickle (Achaar) | A small spoonful of tangy mango, lime, or mixed vegetable pickle adds a sharp and spicy kick that complements the aromatic rice. |
| Shorba (Clear Soup) | A light, spiced broth served before the biryani that helps cleanse the palate and prepare your taste buds for the rich main dish. |
| Gulab Jamun or Kheer | For dessert, these traditional Indian sweets provide a sweet and satisfying finish after a flavorful biryani meal. |
How to Store and Reheat Chicken Biryani
Storage :
| Storage Method | Instructions |
|---|---|
| Refrigerator | Allow the biryani to cool completely before transferring it to an airtight container. It will stay fresh for 3–4 days in the refrigerator. Biryani often tastes even better the next day as the flavors continue to develop. |
| Freezer | Chicken biryani freezes well for up to 3 months. Portion it into meal-sized containers for easy thawing. The rice texture may change slightly after freezing, but the flavor remains excellent. |
| Meal Prep Tip | Prepare a double batch and freeze half for convenient future meals. This is perfect for busy weeks when you want homemade food without spending extra time cooking. |
Reheating Methods :
| Method | Instructions |
|---|---|
| Microwave Method | Place biryani in a microwave-safe container and sprinkle 1–2 tablespoons of water over the top. Cover with a damp paper towel and microwave on medium power for 2–3 minutes, stirring halfway through. The added moisture prevents the rice from drying out. |
| Stovetop Method (Best for Texture) | Add biryani to a pan with a tight-fitting lid. Sprinkle 2–3 tablespoons of water or milk over the rice. Cover and heat on low for 8–10 minutes, stirring occasionally. This method helps maintain the texture of separate rice grains. |
| Oven Method (For Large Portions) | Preheat the oven to 350°F (175°C). Transfer biryani to an oven-safe dish, sprinkle with a little water, and cover tightly with foil. Heat for 20–25 minutes until thoroughly warmed. |
| Air Fryer Method (For Crispy Bottom) | Place biryani in an air fryer-safe pan and heat at 350°F for 8–10 minutes. This method creates a delicious crispy bottom layer while keeping the top fluffy. |
Frequently Asked Questions About Chicken Biryani
Can I use brown rice for chicken biryani ?
- While you can use brown rice, it requires significant adjustments. Brown rice takes longer to cook and has a chewier texture than basmati. You’ll need to parboil it for 20-25 minutes (instead of 5-6) and increase dum cooking time to 30-35 minutes. The result will be healthier but less authentic in texture and flavor.
What’s the difference between biryani and pulao ?
- Great question! Though both are rice dishes, they’re quite different. Biryani uses the layering method with partially cooked rice and meat cooked separately, then steamed together. Pulao is simpler—rice and ingredients are cooked together from the start in a single pot. Biryani is richer, more complex, and typically more aromatic.
Can I make chicken biryani without yogurt ?
- Yes! For dairy-free versions, substitute yogurt with coconut cream, cashew cream, or even tomato puree mixed with a tablespoon of lemon juice. The texture will be slightly different, but the flavor remains delicious. Yogurt provides tanginess and tenderizing properties, so the lemon juice helps replicate that.
Why is my biryani rice mushy ?
- The most common culprit is overcooking the rice during the parboiling stage. Remember, the rice only needs to be 70% cooked before layering—it finishes cooking during dum. Other causes include using too much water in the dum stage or cooking on too high heat, which makes the bottom mushy while the top is undercooked.
Can I use chicken breast instead of thighs ?
- Absolutely! Chicken breast works well, though it can dry out more easily than thighs. To prevent this, don’t overcook the chicken in Step 4—stop when it’s about 70-75% done since it continues cooking during dum. Chicken thighs are more forgiving and stay juicier, which is why they’re often preferred for biryani.
How do I make biryani more flavorful ?
- Several techniques boost flavor: (1) Marinate chicken for 4+ hours or overnight, (2) Use fresh, high-quality spices, (3) Don’t skip the fried onions—they add incredible depth, (4) Add a tablespoon of ghee when layering, (5) Use homemade biryani masala instead of store-bought, (6) Add a splash of rose water or kewra water for authentic fragrance.
Is biryani spicy ?
- Traditional biryani is moderately spiced but not necessarily “hot.” The heat level is easily adjustable—reduce red chili powder and green chilies for mild versions, or increase them for spicier results. The complex flavor comes from aromatic spices like cardamom, cinnamon, and cloves rather than just heat.
Can I make biryani ahead of time ?
- Yes! Biryani is excellent for meal prep. You can complete the recipe entirely, then reheat before serving (see reheating methods above). Alternatively, prepare the marinated chicken and fried onions a day ahead, then complete the cooking on the day you plan to serve.
What is biryani masala made of ?
- Biryani masala typically contains coriander seeds, cumin seeds, black pepper, cardamom, cinnamon, cloves, bay leaves, nutmeg, mace, and dried rose petals. Store-bought versions are convenient, but making your own allows you to customize the blend. Toast whole spices, then grind to a fine powder for the freshest flavor.
How many people does this recipe serve ?
- This recipe yields 6 generous servings as a main course. If serving alongside multiple other dishes (as in a larger Indian meal), it can stretch to 8 servings. For smaller appetites or if you’re serving it with substantial sides, it could feed up to 10 people.
Final Thoughts
Congratulations! You now have all the knowledge you need to create restaurant-quality chicken biryani in your own kitchen. While the recipe might seem lengthy at first glance, most of the steps are simple and become second nature after you’ve made it once or twice.
The beauty of biryani is that it’s both impressive enough for special occasions and practical enough for weeknight family dinners. The leftovers are arguably even better than the fresh-made version, making it perfect for meal prep.
Don’t be discouraged if your first attempt isn’t perfect—biryani is a dish that rewards practice. Each time you make it, you’ll develop a better feel for the rice texture, layering technique, and your preferred spice levels.
Remember the key principles :
- Marinate for flavor
- Parboil rice to only 70%
- Use low heat for dum cooking
- Let it rest before serving
Now grab your ingredients and get cooking! Your kitchen is about to smell absolutely amazing.
📌 Recipe Card
Ingredients
For Marinade:- ☐ 1 lb boneless chicken, cut into pieces
- ☐ 1 cup plain yogurt
- ☐ 1 tbsp ginger-garlic paste
- ☐ 1 tsp red chili powder
- ☐ ½ tsp turmeric powder
- ☐ 1 tsp salt
- ☐ 1 tbsp lemon juice
For Rice:
- ☐ 2 cups basmati rice
- ☐ 4 cups water
- ☐ 2 bay leaves
- ☐ 4–5 green cardamom pods
- ☐ 1-inch cinnamon stick
- ☐ 3–4 cloves
- ☐ 1 tsp salt
For Biryani:
- ☐ 3 tbsp ghee or oil
- ☐ 2 large onions, sliced
- ☐ 2 tomatoes, chopped
- ☐ ¼ cup mint leaves
- ☐ ¼ cup cilantro
- ☐ 2–3 green chilies, slit
- ☐ 1 tbsp biryani masala
- ☐ ½ tsp garam masala
- ☐ Pinch saffron in 2 tbsp warm milk
- ☐ ½ cup fried onions for garnish
Instructions
- Marinate chicken: Combine chicken with yogurt, ginger-garlic paste, spices, and lemon juice. Marinate for 30 minutes to overnight.
- Prepare rice: Rinse and soak basmati rice for 20 minutes. Boil water with spices and salt, add rice, and parboil 5–6 minutes until 70% cooked. Drain.
- Fry onions: Heat ghee in a heavy pot and fry sliced onions until deep golden brown (10–12 minutes). Reserve half for garnish.
- Cook chicken: Add marinated chicken to the pot. Cook 5 minutes. Add tomatoes, biryani masala, garam masala, and chilies. Cook 8–10 minutes until chicken is 80% done and oil separates. Add half the herbs.
- Layer biryani: Spread chicken evenly. Add half the rice, herbs, saffron milk, and fried onions. Add remaining rice and repeat garnishes.
- Dum cooking: Cover pot with foil and lid. Cook on lowest heat 20–25 minutes. Rest 5 minutes.
- Serve: Gently fluff from bottom to top. Garnish with fried onions and herbs. Serve hot with raita.
Recipe Notes
- Rice texture is crucial — parboil to only 70% cooked.
- Best flavor comes from marinating 2–4 hours.
- Adjust chili powder and chilies to control heat.
- Can be made 1 day ahead and reheated.
- Chicken thighs are juicier than breast meat.
- Store 3–4 days refrigerated or freeze up to 3 months.
Calories: 425 | Protein: 28g | Carbohydrates: 52g | Fat: 12g | Saturated Fat: 5g | Cholesterol: 75mg | Sodium: 680mg | Fiber: 2g | Sugar: 4g
Related Recipes You’ll Love :
- Eggs Florentine Recipe – 5 Easy Steps to a Perfect Brunch
- Chicken Wrap Ideas – 7 Best Easy Recipes to Try Today
- Homemade Big Mac Sauce – 5 Minutes to Perfect Copycat Recipe
- Easy Cuban Picadillo – Recipe in 30 Minutes or Less
- Queso Fundido with Chorizo – 7 Easy Steps to Cheesy Perfection
This easy chicken biryani recipe has been tested multiple times to ensure perfect results every time. If you have questions or need troubleshooting help, leave a comment below and I’ll respond within 24 hours!
Your Feedback Helps Us Grow!
There are no reviews yet. Be the first one to write one.