No Bake Biscoff Cheesecake: 5 Easy Steps to Pure Bliss
Table of Contents
Introduction
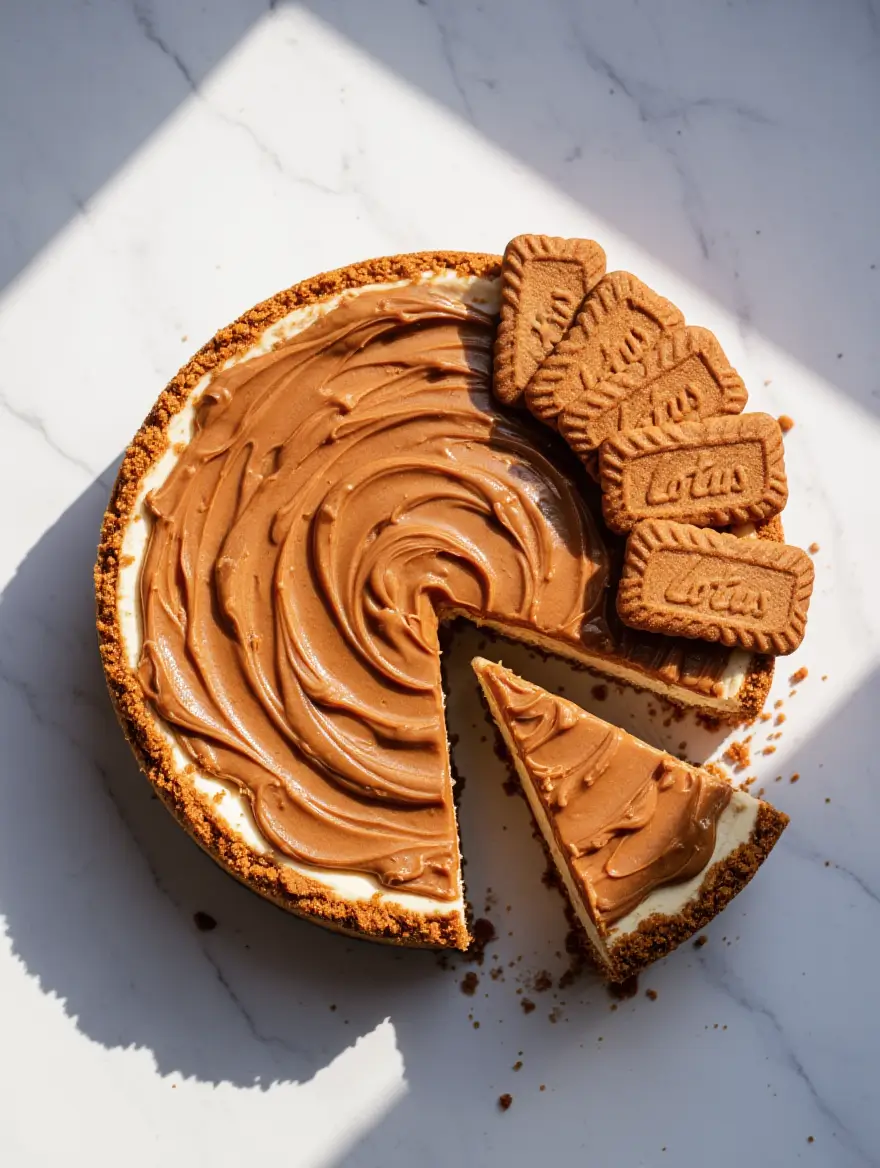
What if you could make a show-stopping, restaurant-worthy dessert without ever turning on your oven? That is exactly the magic behind No Bake Biscoff Cheesecake. According to Google Trends data, searches for no-bake cheesecake recipes have surged by over 65% in the past three years, and Biscoff-based desserts are consistently among the top trending sweet treats globally. It is not hard to see why. This No Bake Biscoff Cheesecake delivers a buttery, spiced speculoos crust layered with a cloud-like cream cheese filling and crowned with a generous drizzle of silky Lotus Biscoff spread. It tastes incredibly indulgent, yet the whole thing comes together in just 20 minutes of active prep time.
Whether you are a seasoned baker or a total beginner, this Easy No Bake Biscoff Cheesecake Recipe is practically foolproof. There is no water bath, no cracked tops, and no anxious oven-watching. Just simple, satisfying steps that lead to one of the most irresistible desserts you will ever serve. Ready to dive in? Let us walk through everything you need to make this Simple No Bake Biscoff Cheesecake Dessert a reality.
Ingredients
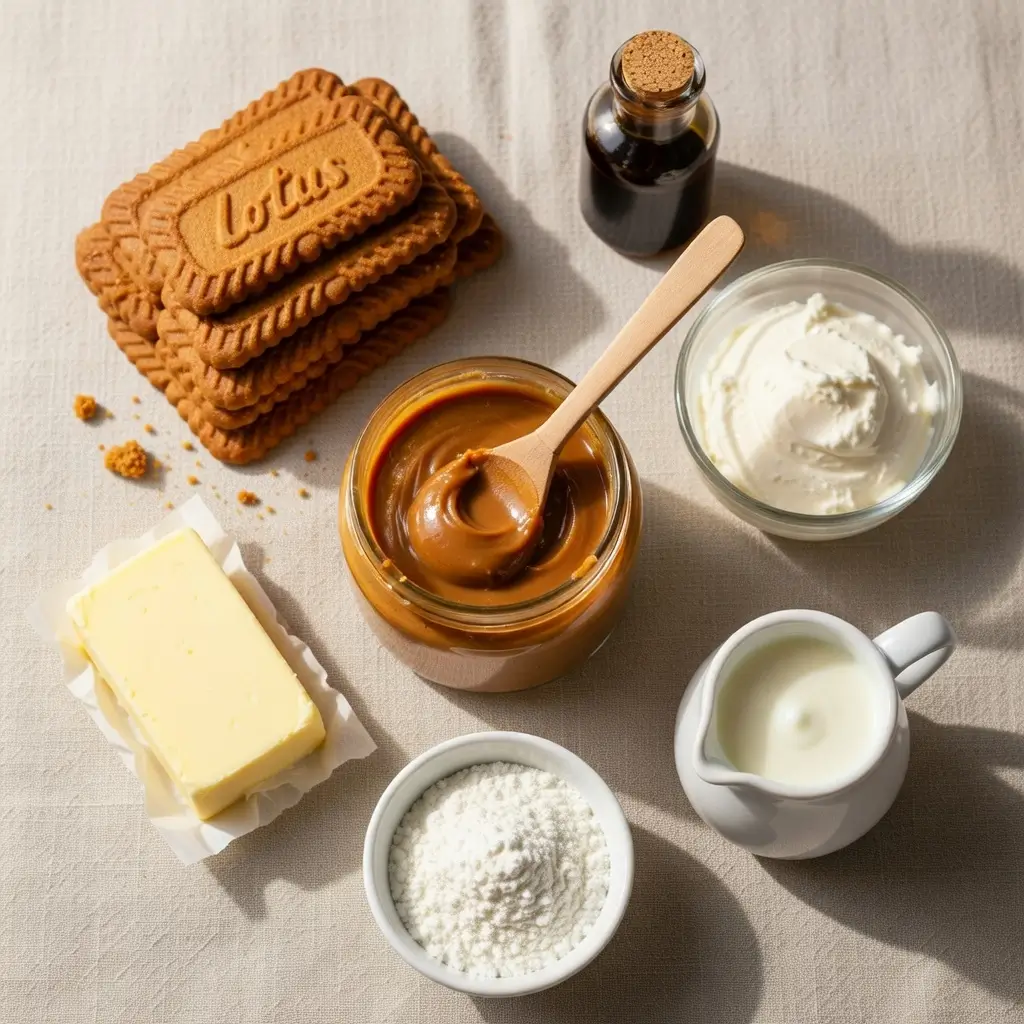
Here is everything you will need to build this gorgeous Lotus Biscoff Cheesecake from the ground up. Every ingredient plays a role, but do not worry if you need to make a swap here and there. We have got substitution ideas covered too.
For the Biscoff Crust :
- 250g (about 30) Lotus Biscoff cookies, finely crushed
- 80g (6 tbsp) unsalted butter, melted
- Pinch of sea salt
For the Cheesecake Filling :
- 500g (2 blocks) full-fat cream cheese, softened to room temperature
- 200ml (3/4 cup) heavy whipping cream, chilled
- 100g (3/4 cup) icing sugar (powdered sugar), sifted
- 200g (3/4 cup) Biscoff spread (smooth), plus extra for topping
- 1 tsp pure vanilla extract
For the Topping :
- 4 tbsp Biscoff spread, warmed until pourable
- 5 to 6 whole Biscoff cookies, for decoration
- Optional: whipped cream rosettes or crushed Biscoff crumble
Substitution Tips : Swap cream cheese for dairy-free cream cheese to make this vegan-friendly. Replace Biscoff spread with sunflower seed butter for a nut-free alternative. No Bake Biscoff Cheesecake Without Gelatin sets beautifully using just whipped cream and cream cheese, so no setting agents are required.
Timing
| Preparation Time | 20 minutes |
|---|---|
| Chilling Time | 4 to 6 hours (overnight recommended for best results) |
| Total Time | Approximately 4 hours 20 minutes |
| Servings | 10 to 12 slices |
Step-by-Step Instructions
Step 1: Build Your Biscoff Base
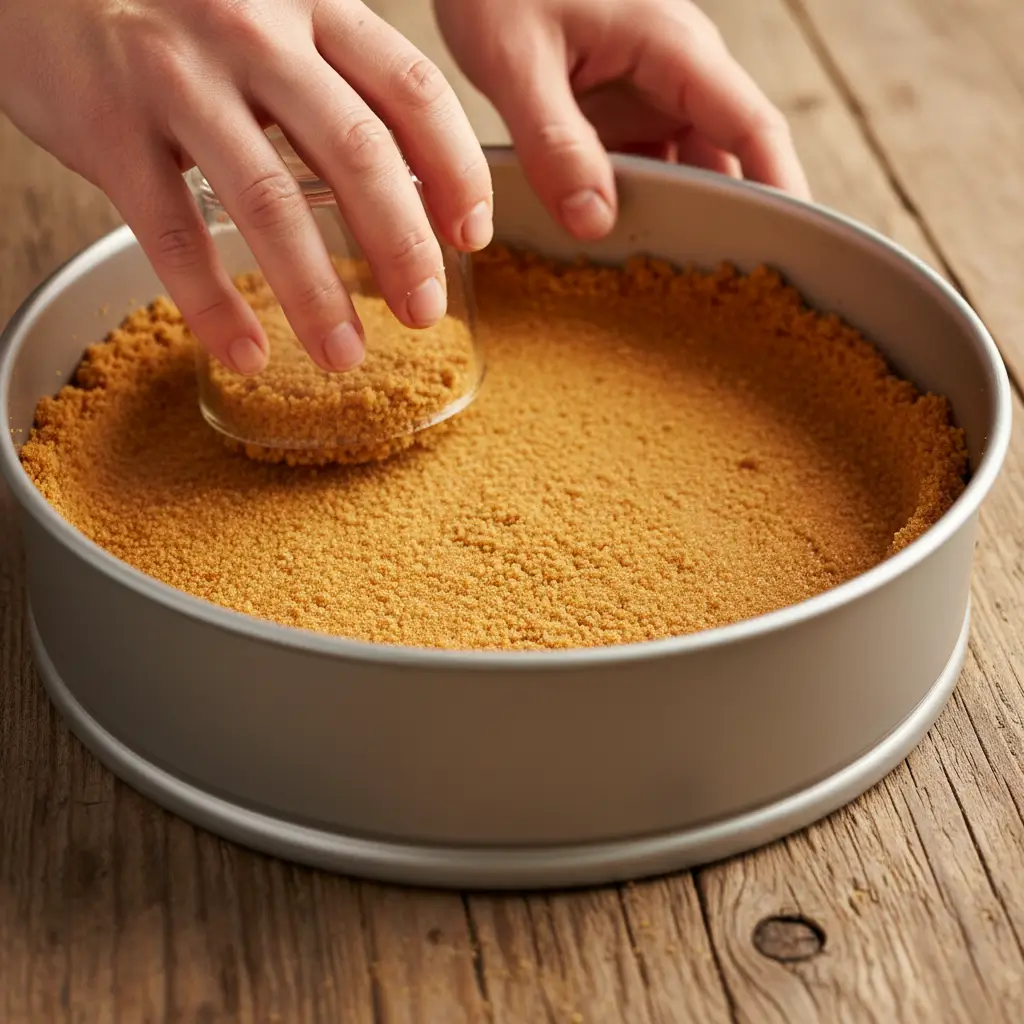
Add your Lotus Biscoff cookies to a food processor and blitz until they resemble fine sand. No food processor? No problem. Pop them in a zip-lock bag and crush them with a rolling pin. Transfer the crumbs to a bowl, pour in the melted butter and a pinch of salt, then stir until every crumb is coated and the mixture holds together when pressed. Tip the mixture into a 9-inch springform pan and use the back of a spoon or the base of a glass to press it firmly and evenly across the bottom and slightly up the sides. Place in the freezer for 15 minutes while you prepare the filling.
Step 2: Whip the Cream to Soft Peaks
Using a hand mixer or stand mixer with the whisk attachment, beat your chilled heavy whipping cream until it forms soft, billowy peaks. This should take about 2 to 3 minutes on medium-high speed. Do not over-whip or you will end up with butter instead of cream. Set this aside in the refrigerator while you work on the cream cheese base. Keeping everything cold at this stage is the key to a firm, sliceable No Bake Biscoff Cheesecake that holds its shape beautifully.
Step 3: Create the Dreamy Biscoff Filling
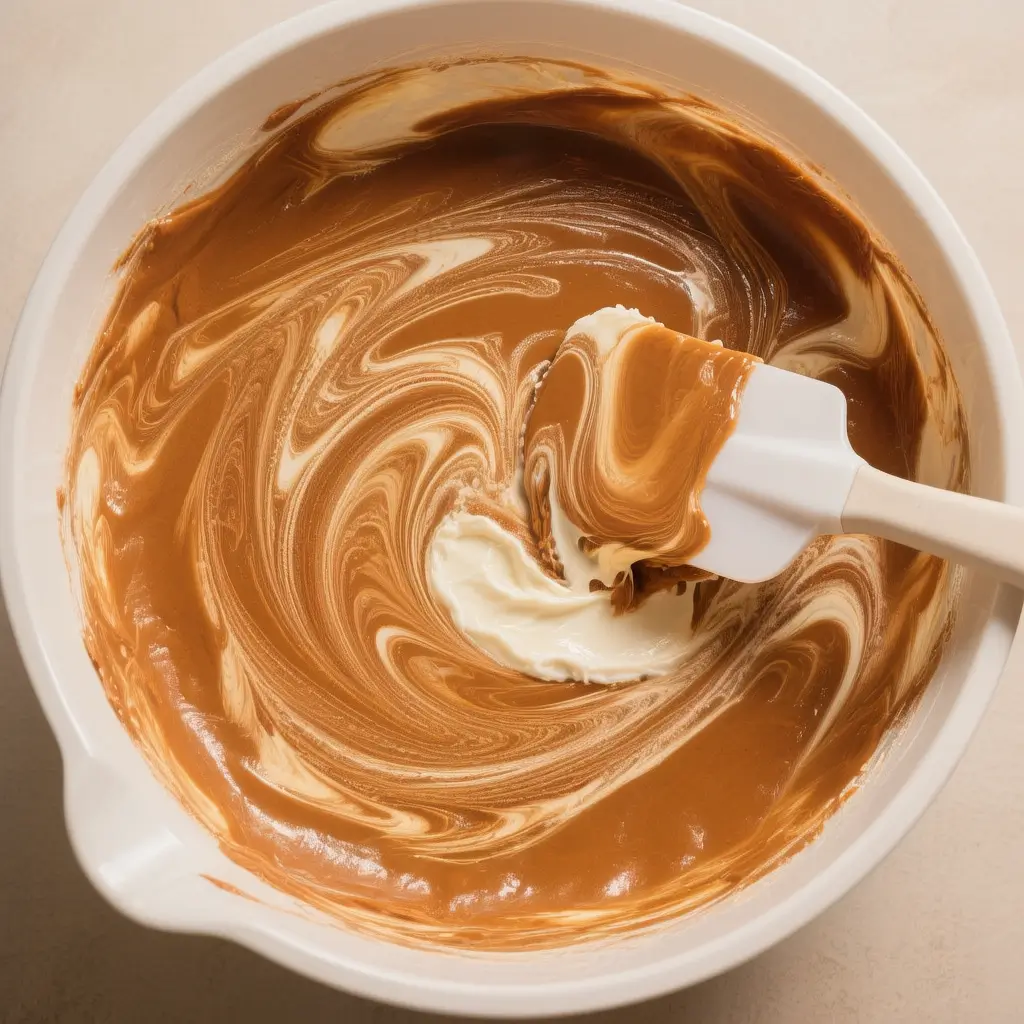
In a large mixing bowl, beat the softened cream cheese and sifted icing sugar together until completely smooth and lump-free, about 2 minutes. Add the Biscoff spread and vanilla extract, then beat again until the mixture is silky, fragrant, and deeply caramel-colored. This is where the magic happens. The Biscoff Cookie Butter Cheesecake flavor really comes alive at this stage. Now, gently fold in your whipped cream using a spatula, using slow, sweeping motions to preserve as much volume and airiness as possible. Keep folding until no white streaks remain.
Step 4: Fill and Smooth
Retrieve your chilled crust from the freezer. Spoon the creamy Biscoff filling on top, spreading it into an even layer with an offset spatula or the back of a large spoon. For a perfectly smooth top, run the spatula in one long, fluid sweep across the surface. Tap the pan gently on the counter a few times to release any air bubbles hiding beneath the surface. Cover loosely with plastic wrap and transfer the cheesecake to the refrigerator. Chill for at least 4 hours, though overnight is highly recommended for the cleanest slices and the most developed flavor.
Step 5: Decorate and Serve
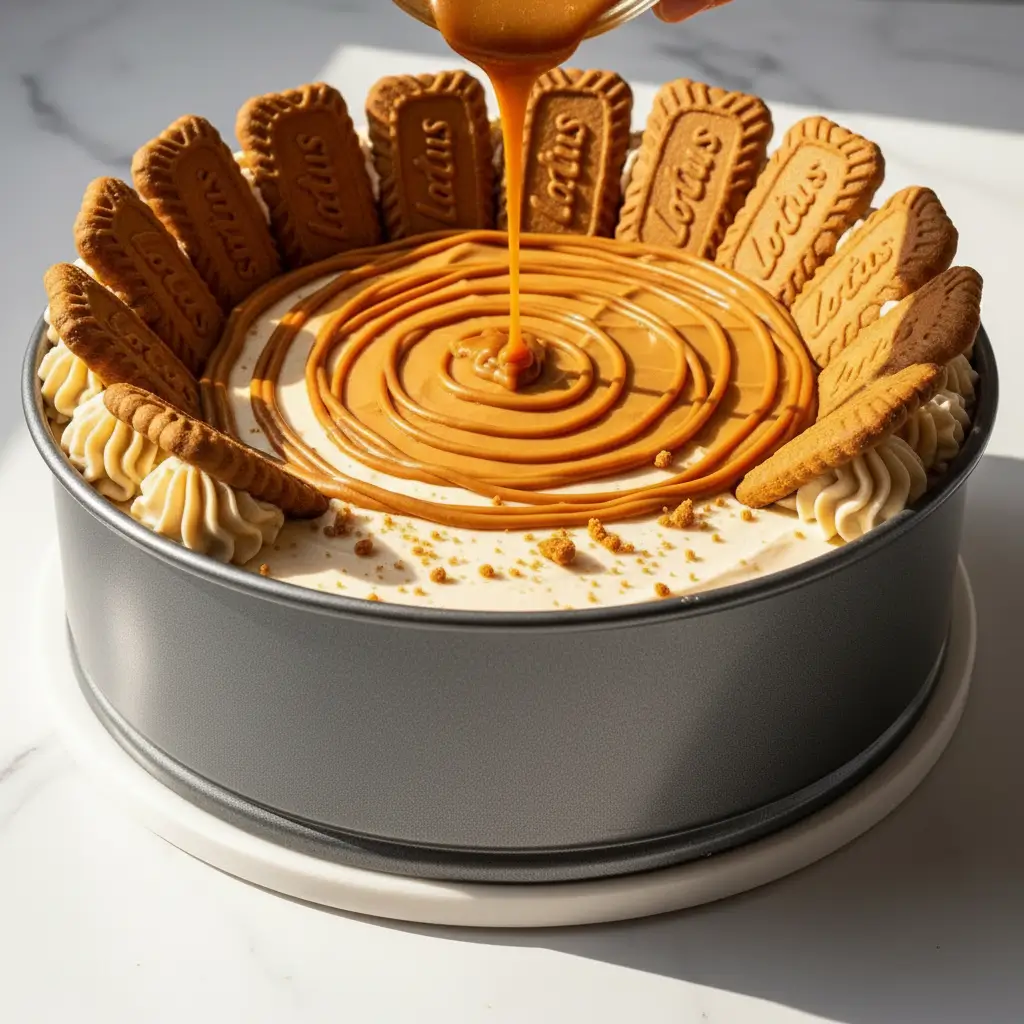
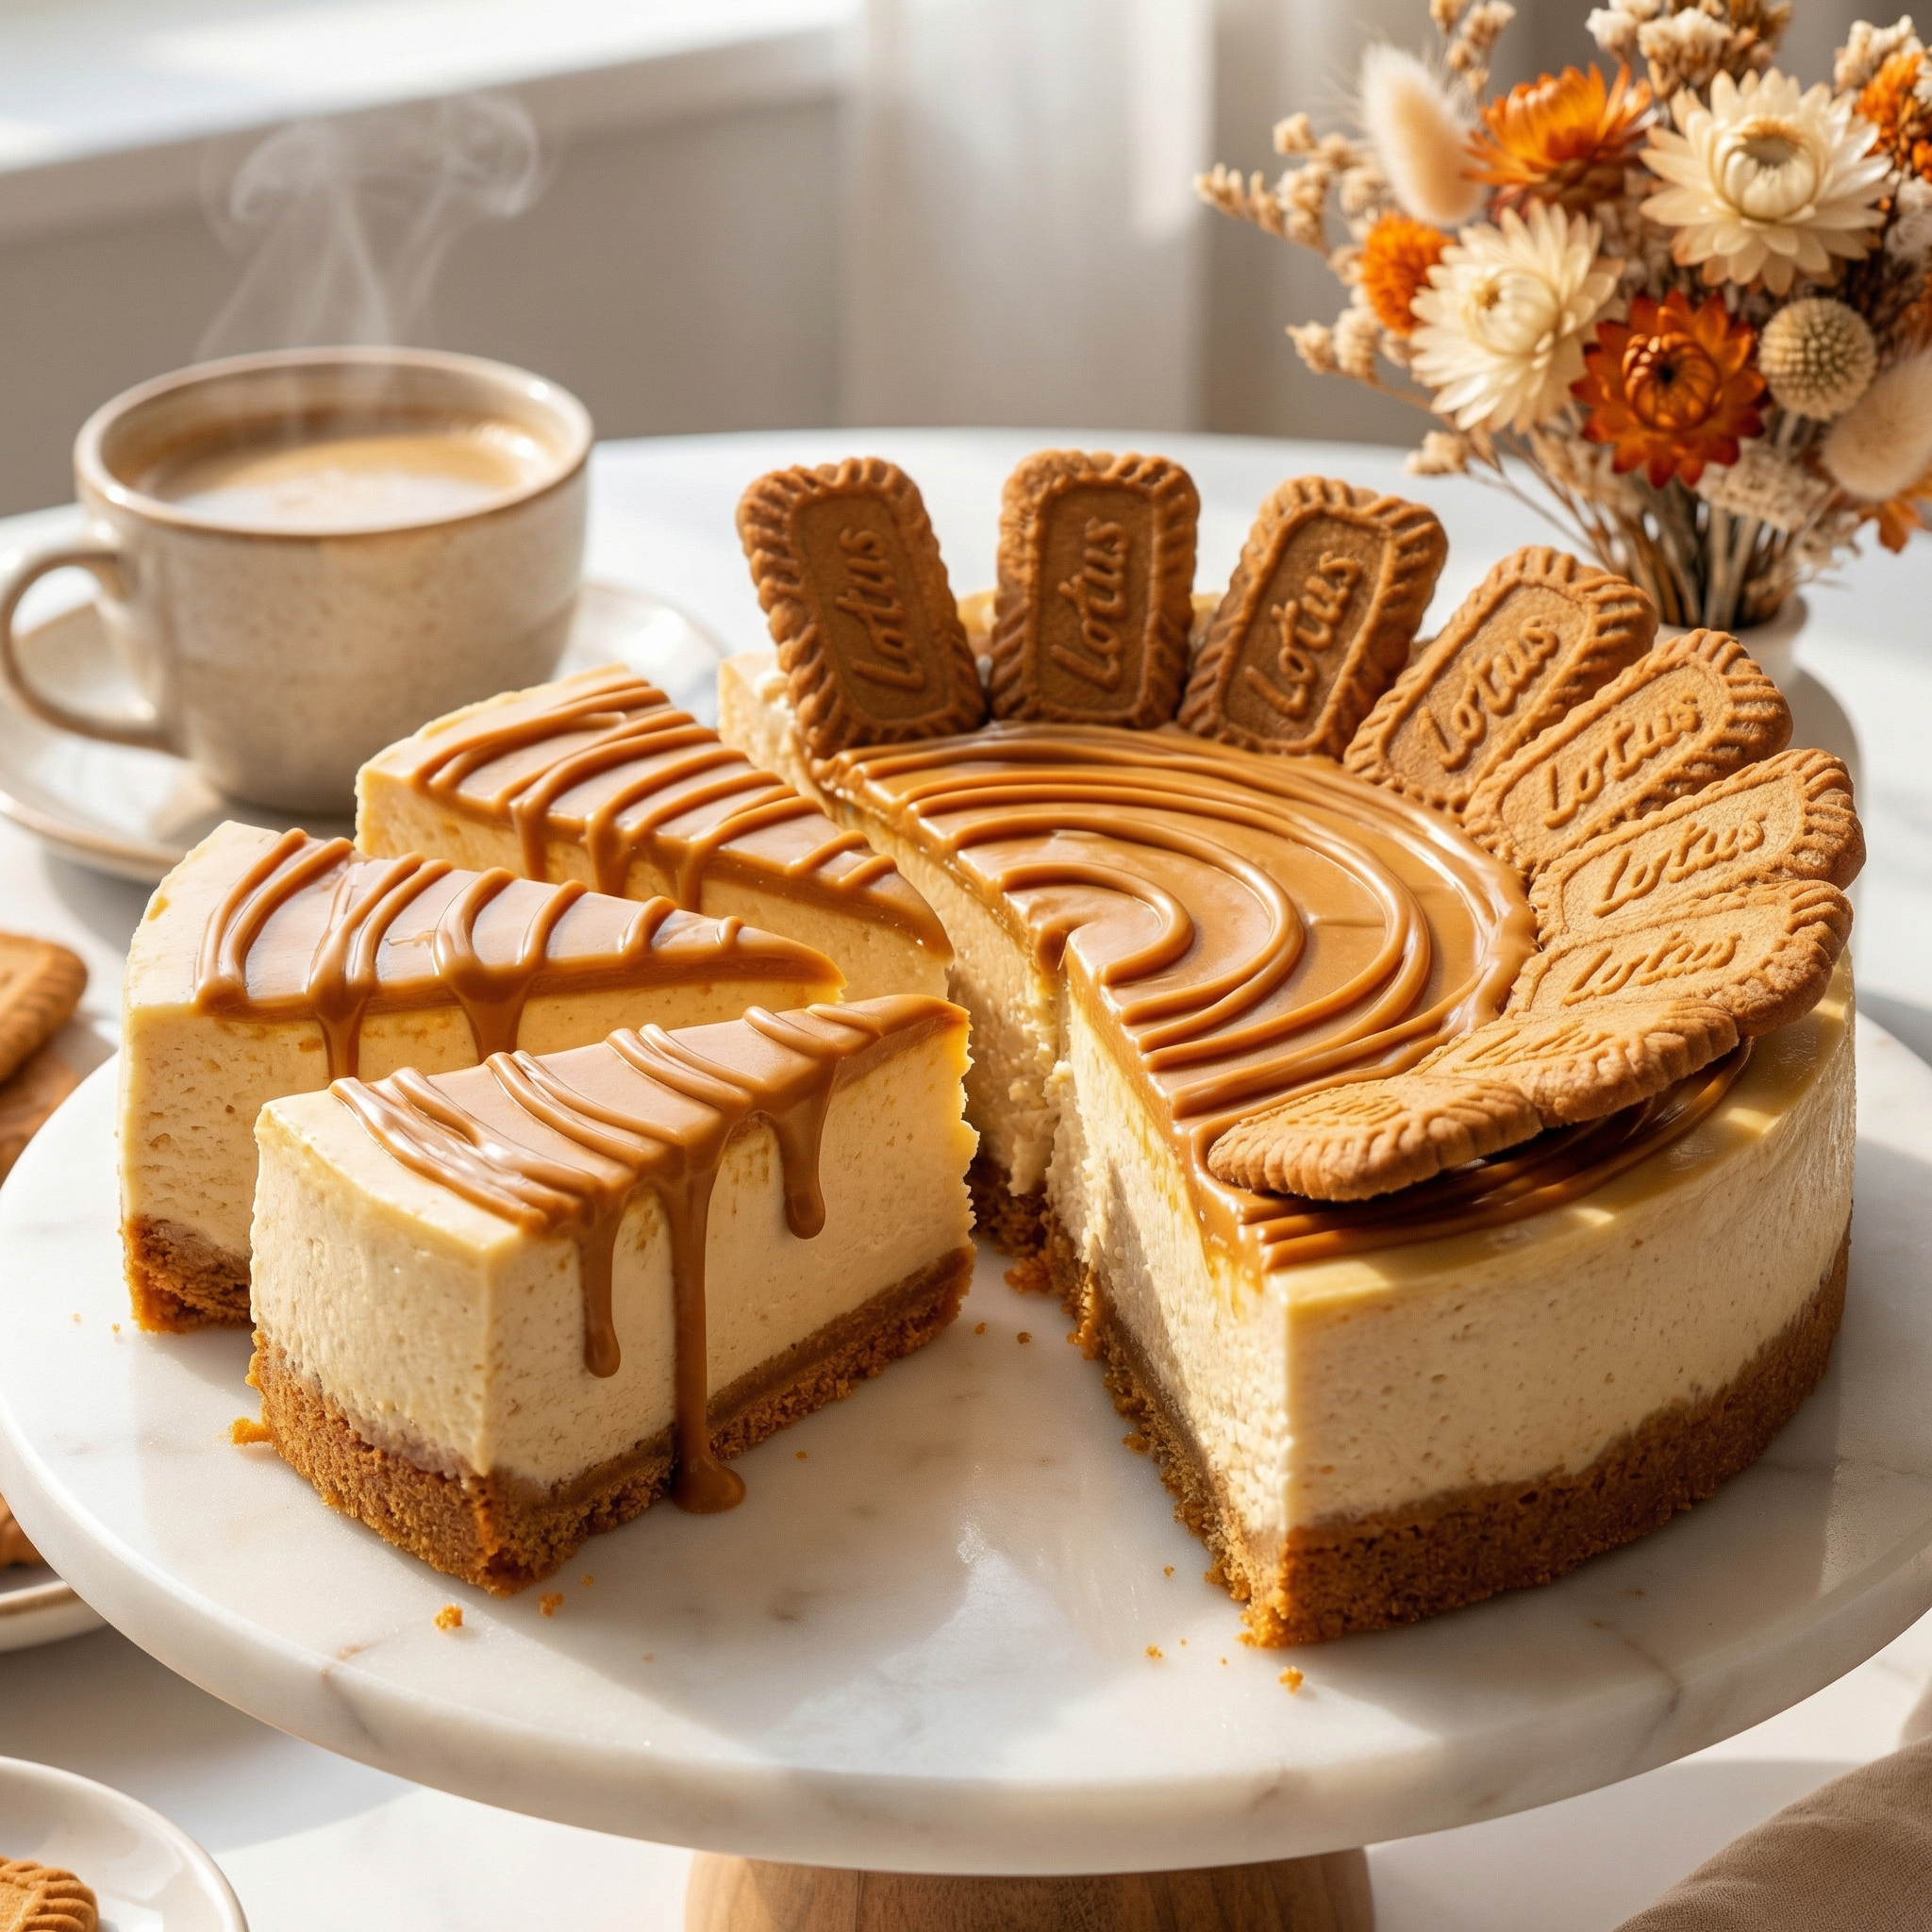
Once your No Bake Biscoff Cheesecake has set, it is time for the finishing flourish. Warm the extra Biscoff spread in the microwave for 15 to 20 seconds until it is pourable but not hot. Drizzle it over the top of the cheesecake in a generous, free-flowing pattern. Arrange whole Biscoff cookies around the edge or on top for a picture-perfect finish. For extra drama, add swirls of whipped cream or a light dusting of crushed Biscoff crumble. Run a warm knife around the edge of the springform pan before releasing the sides for clean, professional-looking results.
Nutritional Information
| Serving Size | 1 slice (based on 10 servings per cheesecake) |
|---|---|
| Calories | 480 kcal |
| Total Fat | 33g (including 18g saturated fat) |
| Carbohydrates | 42g (including 28g sugars) |
| Protein | 5g |
| Fiber | 0.5g |
| Sodium | 240mg |
Healthier Alternatives for the Recipe
Want to enjoy No Bake Biscoff Cheesecake With Cream Cheese but with a lighter nutritional profile ? Here are some smart swaps that keep the flavor front and center while trimming calories and fat :
- Use reduced-fat cream cheese : Saves up to 80 calories per serving without significantly affecting the texture.
- Swap heavy cream for Greek yogurt : Adds protein and cuts saturated fat. The texture will be slightly denser but equally delicious.
- Reduce sugar : Cut icing sugar by 25% and add a tiny pinch of cinnamon to enhance perceived sweetness naturally.
- Use a lighter crust : Blend half Biscoff cookies with half oat-based digestive biscuits to reduce richness.
- Portion control trick : Make individual mini cheesecakes in a muffin tin. Research shows smaller portions naturally reduce overall consumption by up to 30%.
- Dairy-free version : Use coconut cream instead of heavy cream and vegan cream cheese for a plant-based No Bake Biscoff Cheesecake that is just as creamy.
Serving Suggestions
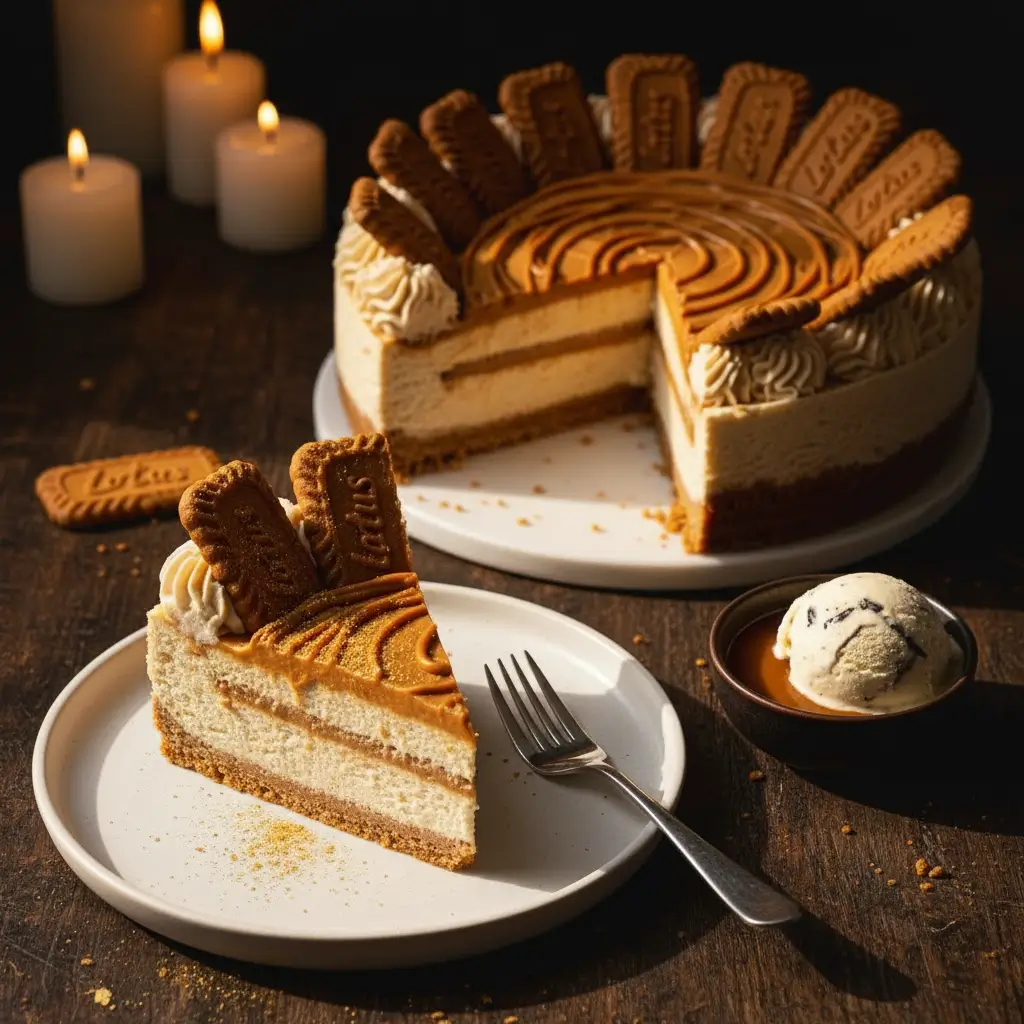
| Ice Cream Pairing | Pair each slice with a scoop of vanilla bean ice cream to create a luxurious warm-cold contrast that enhances both flavor and texture. |
|---|---|
| Biscoff Sauce Enhancement | Serve alongside a small ramekin of warm Biscoff sauce, allowing guests to dip each forkful for an intensified caramelized biscuit flavor experience. |
| Elegant Holiday Presentation | Add a light dusting of edible gold glitter or cinnamon to create a festive and visually stunning dessert perfect for special occasions. |
| Professional Slicing Technique | Use a hot, dry knife for slicing. Run the knife under hot water and wipe dry between cuts to achieve perfectly clean, professional-looking slices. |
| Optimal Serving Temperature | Serve chilled directly from the refrigerator for the firmest texture and cleanest slices. Warmer cheesecake may soften too much for ideal presentation. |
| Dinner Party Preparation | Pre-slice and plate individual servings before guests arrive to ensure smooth, stress-free hosting and an elegant presentation. |
Common Mistakes to Avoid

| Using Cold Cream Cheese | Cold cream cheese will not blend smoothly and can create a lumpy filling. Always allow it to sit at room temperature for at least 45 minutes before mixing. |
|---|---|
| Skimping on Chilling Time | Insufficient chilling is the main reason no-bake cheesecakes fail to set properly. Refrigerate for at least 4 hours, but overnight chilling produces the best structure and texture. |
| Over-Whipping the Cream | Whipped cream that is too stiff creates a grainy and heavy filling. Aim for soft to medium peaks to maintain a smooth and airy consistency. |
| Not Pressing the Crust Firmly | A loosely packed crust will crumble during slicing. Press the crust firmly using the bottom of a measuring cup to ensure even compression and stability. |
| Adding Warm Biscoff Spread | Warm spread can melt the cream mixture and prevent proper setting. Always allow it to cool to room temperature before mixing it into the filling. |
| Skipping the Springform Pan | A regular cake pan makes removal difficult and can damage the cheesecake. A springform pan allows clean release and professional presentation. |
Storing Tips for the Recipe
| Refrigerator Storage | Store covered with plastic wrap or in an airtight container for up to 5 days. The crust may soften slightly over time, but the flavor deepens and improves. |
|---|---|
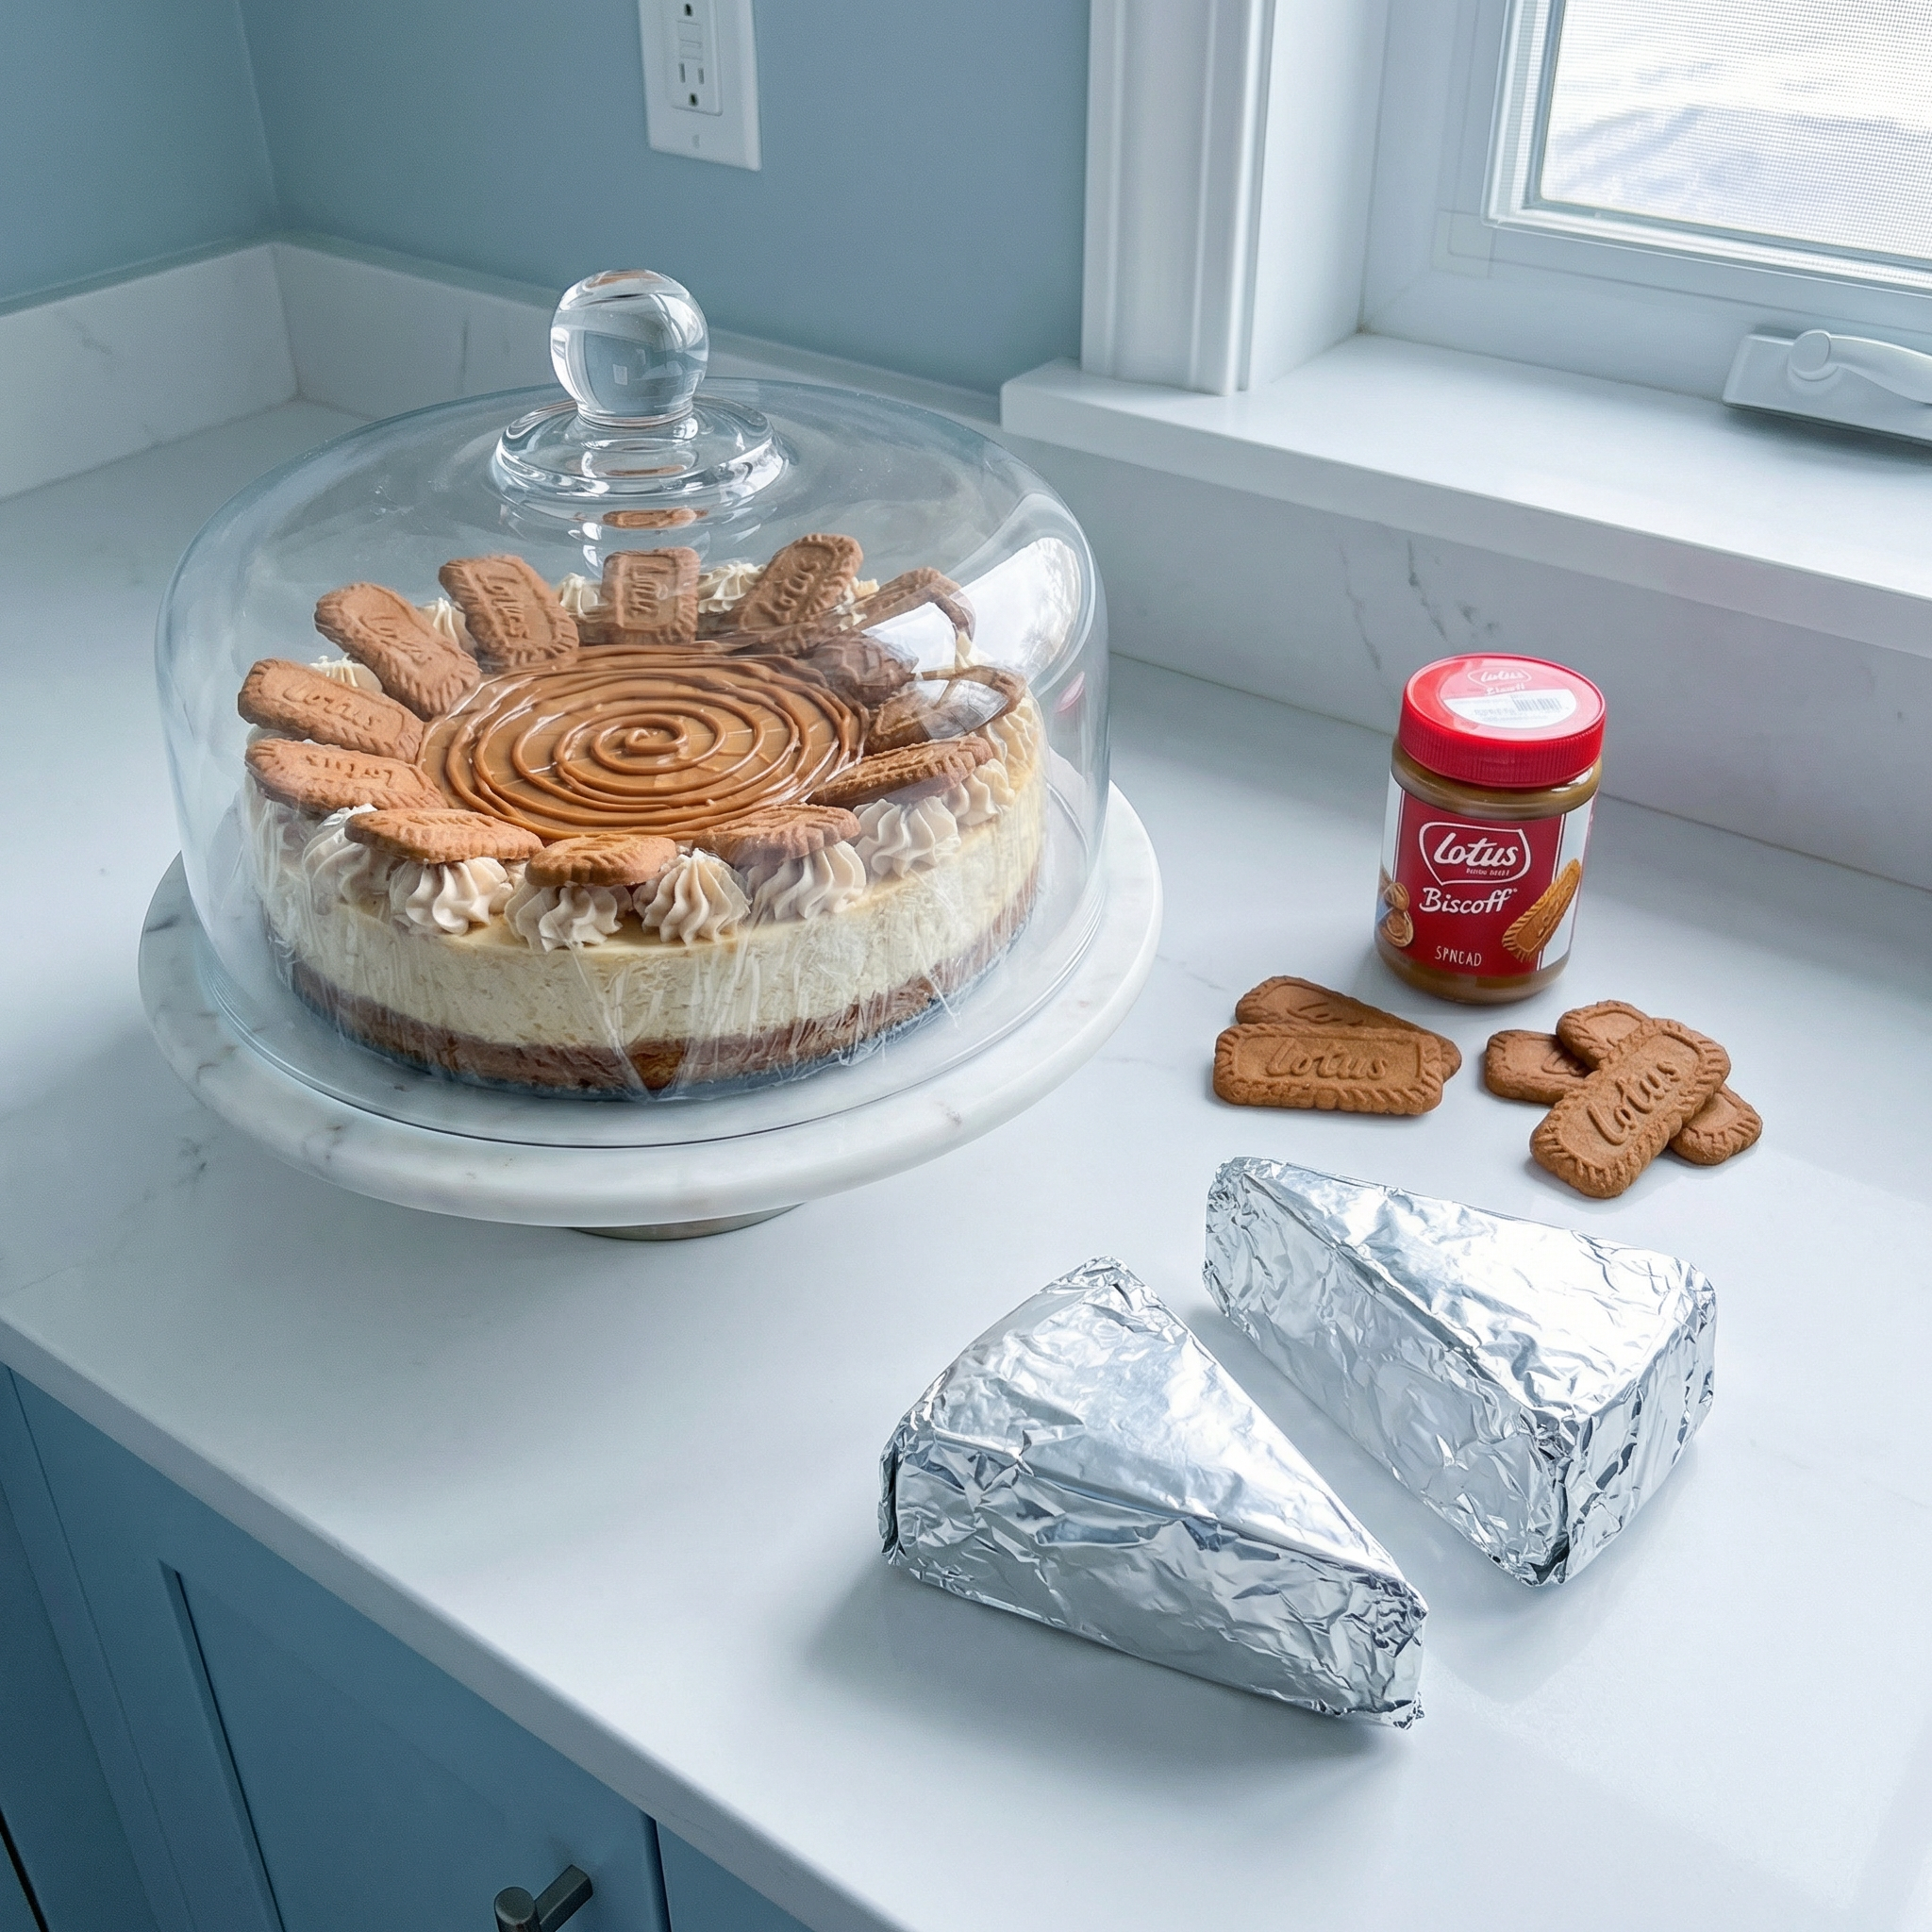
| Freezer Storage | Wrap individual slices tightly in plastic wrap, then foil, and freeze for up to 2 months. Thaw overnight in the refrigerator before serving for best texture and flavor. |
| Toppings Storage Tip | Avoid adding Biscoff drizzle or cookie decorations before storing. Add toppings just before serving to maintain the freshest appearance and texture. |
| Make-Ahead Tip | The crust can be pressed and frozen up to 3 days in advance. The filling can be prepared and refrigerated up to 24 hours before adding it to the crust. |
| Room Temperature Safety | Do not leave at room temperature for more than 2 hours. As a cream cheese-based dessert, it must be refrigerated to ensure food safety and freshness. |
Conclusion
There you have it: a complete guide to making the most irresistible No Bake Biscoff Cheesecake you have ever tasted. From the buttery, spiced Biscoff crust to the cloud-like cream cheese filling and that glossy Biscoff drizzle on top, every element of this dessert is designed to delight. The best part? No oven required. Just 20 minutes of prep, a few hours of patience, and you will have a dessert that looks like it came straight from a professional bakery.
This Easy No Bake Biscoff Cheesecake Recipe is perfect for entertaining, gifting, or simply treating yourself on a weeknight when you need something extraordinary. We hope this step-by-step guide has given you the confidence to make it your own. Now it is your turn: give this recipe a try, snap a photo of your beautiful creation, and share it in the comments below. We would love to hear how it turned out and what creative toppings you added. Happy no-baking!
Frequently Asked Questions
Can I make No Bake Biscoff Cheesecake Without Gelatin ?
- Absolutely. This recipe is specifically designed as a No Bake Biscoff Cheesecake Without Gelatin. The combination of full-fat cream cheese and whipped heavy cream provides more than enough structure for the cheesecake to hold its shape perfectly after chilling. No setting agents needed whatsoever.
How long does No Bake Biscoff Cheesecake need to set ?
- A minimum of 4 hours in the refrigerator is required, but overnight chilling (8 to 12 hours) is strongly recommended. The longer it chills, the firmer and cleaner-slicing it becomes. If you are in a hurry, the freezer can accelerate setting: chill for 1 hour in the freezer, then transfer to the refrigerator for at least 1 more hour before serving.
Can I use crunchy Biscoff spread instead of smooth ?
- Yes, and it adds a wonderful textural contrast. Crunchy Biscoff spread works beautifully in the filling, giving little pockets of cookie crunch in every bite. For the drizzle topping, smooth spread is recommended as it creates a cleaner, more professional-looking finish.
What can I use instead of Biscoff cookies for the crust ?
- Graham crackers, digestive biscuits, or gingersnaps all make excellent substitutes. The flavor profile will shift slightly, but the texture of the crust will be just as satisfying. For the most authentic Lotus Biscoff Cheesecake experience though, we strongly recommend sticking with the original Biscoff cookies.
Is No Bake Biscoff Cheesecake suitable for freezing ?
- Yes, this cheesecake freezes brilliantly. Wrap individual slices or the whole cheesecake tightly in plastic wrap followed by a layer of foil and freeze for up to 2 months. Always thaw overnight in the refrigerator rather than at room temperature for the safest and best-textured result.
Can I make this recipe gluten-free ?
- Lotus Biscoff cookies do contain wheat, so the classic version is not gluten-free. However, you can substitute with gluten-free speculoos-style cookies if available in your region, or use a gluten-free graham cracker crust. The filling itself is naturally gluten-free, making it easy to adapt the recipe with just a crust swap.
Your Feedback Helps Us Grow!
There are no reviews yet. Be the first one to write one.